
Descargar la aplicación


Servicios al cliente
Sobre nosotros
Copyright © 2025 Desertcart Holdings Limited
Descargar la aplicación

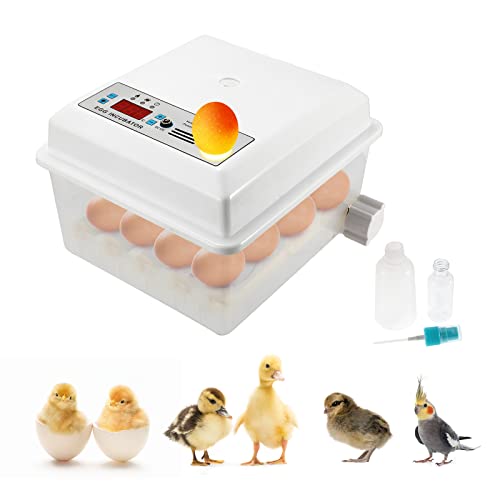
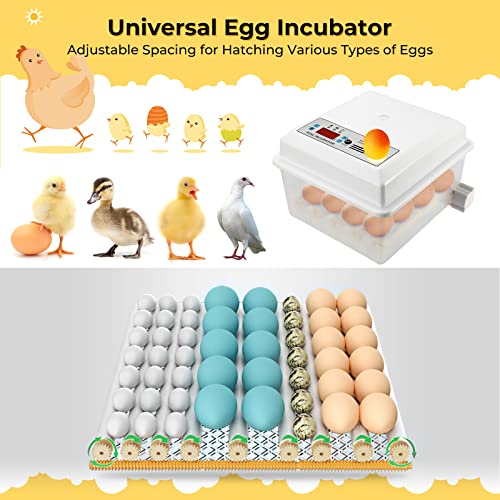


🥚 Hatch smarter, not harder — your all-in-one poultry incubator!
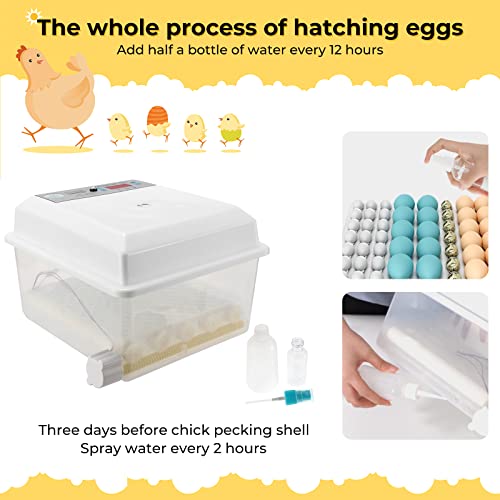
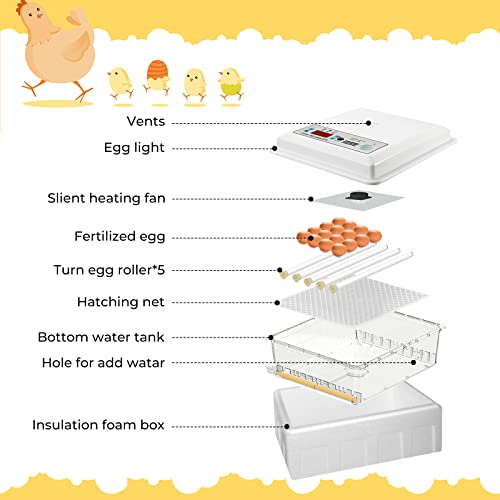
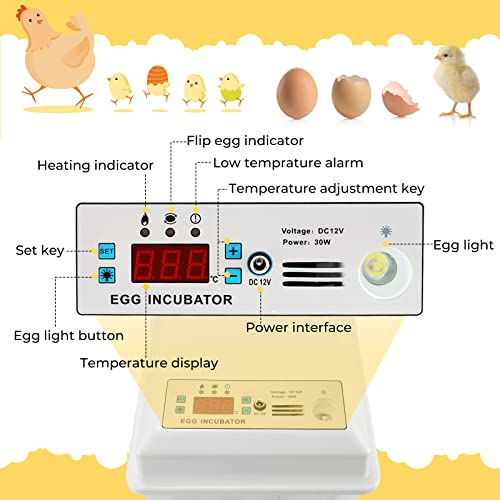
The POWLAB Fully Automatic Egg Incubator holds up to 16 eggs and features precise digital temperature control, an automatic egg turner that rotates eggs every 90 minutes, and a built-in egg candler for easy embryo monitoring. Its energy-saving foam insulation ensures stable conditions, while the transparent design offers clear visibility, making it perfect for both beginners and seasoned poultry enthusiasts.


| ASIN | B087LYQC89 |
| Best Sellers Rank | #412,156 in Industrial & Scientific ( See Top 100 in Industrial & Scientific ) #3,739 in Poultry Habitat Supplies #14,259 in Lab Instruments & Equipment |
| Date First Available | April 24, 2020 |
| Item Weight | 3.12 pounds |
| Manufacturer | POWLAB |
| Product Dimensions | 12.6 x 8.07 x 4.92 inches |
J**E
Hatched several chicken babies!
Incubator is small and quiet - directions are lacking. Mine didn't come with the bottle to add water to regulate humidity. It serves its purpose but the electronics are difficult to use and the directions are exactly zero help.
M**L
Buen producto
B**S
Powlab 16 egg incubator temperature monitor is not accurate
The temperature monitor is not accurate and does not work. There is no humidity control.
D**D
Ok
Well, it's a cheap incubator. I have eggs in there. The thing rolls them around. The lid doesn't actually fit, so you have to try to kinda try to line it up to sit on there. The adaptor gets really hot, which is probably a fire hazard. The heater runs nearly constantly. The alarm went off for half an hour today, the 3rd day I've had it running. It's not a clear incubator as pictured, because the foam bottom must stay on at all times, and theres no way to see inside it at all without removing the ill fitting lid... Um. I'm crosing my fingers it actually hatches something.
J**M
No hygrometer, but there are work arounds.
UPDATE: It's been a few weeks and my quail have hatched! 5 of the eggs were never fertilized, and of the remaining 9, 7 hatched. Here's a few things I've learned since writing the above. 1. The temperature will drop a full degree or two when you put the water in, and remain low for a few hours. Don't worry about it! it will come back up. Whatever you do, don't try to raise the temperature (when the water finally comes to temp and now you're above your target temp, you'll scorch your chicks. It's much worse to have the temp too high than too low). 2. The temperature below the rollers is lower than the temperature at the rollers. If you have a thermostat or hygrometer, put it where you eggs are, not below them. But really it doesn't matter, you don't need a thermostat or hygrometer. 3. I recommended below to use a cup with water to humidify the incubator. I still think that's a great option because the depth means fewer refills. However, that only works for small eggs like quail. On larger eggs, the rollers will be spaced further apart, and there will be no room for a cup. Also, to refill the cup you have to take the lid off and let the heat escape. Easier is to use the included water bottle to squirt water in the side holes. The two holes lead to two basins, one small for incubation, one large for lockdown. If you use these, you don't need to worry about measuring humidity of using a towel etc. But, you'll also have to refill more often, because the basins aren't as deep. 4. Quail eggs are resilient! You may think you've totally screwed it up, with humidity too high or too low, or you forgot to sanitize, or you did sanitize and your friend says thats bad because it hurts the membrane, or the temprature was this or that. Just calm down and give the eggs a chance. 5. They include a spray bottle to sanitize the eggs. I use 50% diluted hydrogen peroxide, but you can get other recipes for sanitizer online. I recommend using it. You don't need to scrub them down, though that probably won't kill them; mainly it'll get your friends off your back because they swear you're ruining their antibiotic membrane. So just spray them, don't scrub them. 6. The manual is helpful but seriously lacking so much information. mostly it's just there to tell you how to turn it on and set the temp. They don't mention how or why or when to sanitize or humidify or anything like that. That's OK! you don't need it. You have this comment right here, and a million people online. ORIGINAL REVIEW: I'm incubating quail as we speak, and I full expect them all to die because of the struggle is been to keep a good humidity. But I fully expect next batch to do well. Listen to this advice and you won't need to buy a hygrometer. I bought a hygrometer so I could figure out how to keep things humid enough. Now I have the data, so you don't need to buy the hygrometer. A 6 or 8 ounce cup will keep the humidity around 65% with the vent closed. Add a bit of paper towel, and it'll bring it up to about 70%. That's too high for the first fifteen days. You want to target between 35 and 45%. I found the best way to do that is with the same 6 ounce cup, and the vent open. (I'm at 36% humidity right now). I also tried two damp rags. That took the humidity to 96%. I don't think even the vent could dry the air out fast enough. I'm pretty sure I drowned the baby chicks with that experiment. But that's a great humidity after lock down (day 16 and on). I also found the temperature was low on average. (The heater takes it up to temp, but let's it drop a few tenths of a degree below before turning it back on). So here's the complete formula. Put an 8 ounce cup in with the vent open for the first 15 days (or longer for chicken). During lockdown, close the vent, and add the damp rags in a bowl of water (so they don't dry out). During the entire time, have your temp set at one or maybe two tenths of a degree above your target average. All these humidity numbers are based on an arid climate. You may have to adjust if you live in a swamp.
G**T
Value for money
Nice and compact but yet the perfect size to hatch up to 16 eggs in it, depending on the size of egg. I've got chicks busy hatching as we speak.. so thumbs up for this incubator
L**Y
Great size for small cluches of bigger eggs
I just set my first set of Brahma eggs with out being tight 13 fits the instructions could be a little more informative for beginners
C**A
Fácil de usar, tal como se describe en el producto
Trustpilot
Hace 1 mes
Hace 1 día