We remain fully operational. Our teams are working around the clock to ensure your deliveries continue safely.

Descargar la aplicación


Servicios al cliente
Sobre nosotros
Copyright © 2025 Desertcart Holdings Limited
Descargar la aplicación


Buy anything from 5,000+ international stores. One checkout price. No surprise fees. Join 2M+ shoppers on Desertcart.
Desertcart purchases this item on your behalf and handles shipping, customs, and support to Bolivia.
❄️ Level up your Switch style with glacier-clear coolness!
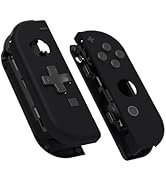
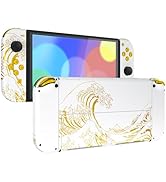
The eXtremeRate DIY Replacement Shell Buttons kit offers a precision-cut, durable ABS housing in a striking Clear Glacier Blue, designed specifically for Nintendo Switch and Switch OLED Joy-Con controllers. This all-in-one customization set includes colorful buttons, a screwdriver set, and spare screws, empowering gamers with moderate DIY skills to upgrade their controllers with confidence using a detailed YouTube installation guide.


| ASIN | B08CB2PVP8 |
| Best Sellers Rank | #3,975 in Video Games ( See Top 100 in Video Games ) #54 in Nintendo Switch Faceplates, Protectors & Skins |
| Customer Reviews | 4.4 4.4 out of 5 stars (2,780) |
| Date First Available | July 1, 2020 |
| Item Weight | 1.06 ounces |
| Item model number | CM506 |
| Manufacturer | Extremerate |
| Product Dimensions | 3.15"W x 1.97"H |
G**Z
Highly recommend!!
Love the overall quality of these shells, they look and feel top notch! Yeah it took me a bit to get it all done, but I followed a YouTube video and knocked it out in a couple of hours. Don’t listen to the people saying the included screwdriver is trash, it worked just fine for me! Everything was plug and play, IMO pretty easy if you’re somewhat new to working on things like this. The color is labeled glacier blue but to me it’s more on the lines of just plain clear, but I don’t mind how everything turned out!
G**O
Perfecto
Great purchase. Screw holes could have been pre-tapped. That's not something you wanna try to do when you have the electronics in the case. The last thing you want is your driver popping off and hitting something. That's just a nit-pick though. They fit great and look great. Very happy with my purchase.
X**X
Amazing product, crappy screws, delicate installation
Only complaint is the new screws included strip easily so i recommend using the screws your joycons came with, other than that the shell quality is incredible especially for the price and i’m in love with the screwdriver it came with. Ignore any reviews complaining about breaking their joycons as this is entirely human error and if I could do it I'm confident most can too (just be careful and follow a video guide, these devices are incredibly small and intricate)
F**F
SO pretty!
I will preface this by saying that you need to be in a good headspace and have a clean area to work before you start this project. It's not hard, but it's tedious! Follow along with the video for the glacier shell with commentary on YouTube and you'll be golden. Now, I couldn't find any photos of the glitter shells, so I took a bit of a gamble buying these. I'm so pleased with this color! The listing photos don't do them justice at all. The glitter is a gorgeous rainbow/holographic and the translucent green and blue is like a beautiful tropical ocean. I do kind of wish the buttons had a different texture so they stood out better. My tools were not magnetic, but I fixed that by rubbing a fridge magnet over the bits. I wish this kit included a pry tool for disconnecting the battery. And again, use the video they made for the glacier shell. Overall, the production quality feels great and I'll be recommending these to my friends.
I**U
Straightforward enough, Good quality, Some caveats though
I didn't bother watching a video as I'm impatient but figuring it out was fairly straightforward so installation as long as you take it slow and patient should be pretty easy. The ribbon cables inside the controller are the most annoying things out of the whole ordeal, so I'd highly recommend getting some cheap electronic tweezers as without those you'll definitely be sitting there for a while trying to get them in. There are also very tiny springs under the triggers which you'll want to be careful of not having them fly off into the netherworld, though it did come with replacement springs if you happen to lose them in the process. I didn't need to sand anything or make any shell modifications it was pretty much perfectly 1:1, much better than other shells I've experienced. I did not use the buttons it came with though and opted to use the black buttons since I think it looks nicer and they have a better texture. The buttons come on a little plastic mold so you may have to cut off some bits if you use them. The replacement screws are nicer than nintendos screws to avoid stripping since they use a #00 instead of a Y00, so make sure to use the included screws instead of nintendos. Just make sure to not screw them in excessively tightly or you'll have a hard time opening it back up since small screws are prone to stripping no matter the tools of which you use. Despite reviews on here in my opinion the screwdriver it came with is actually pretty alright. I had some nintendo screw drivers already from modding my gameboys and the one included was better than them, nice weight to it so you can apply pressure and slowly unscrew to avoid stripping. I ended up having to take back apart one of the them, as a ribbon cable ended up not being pushed in perfectly and the SR SL buttons didn't work. I anticipated this and made sure to not screw in the last black screws before testing them out. The switch has a menu option to test controller functionality so you can check each button is working properly which you should do before as it's very possible you'll not be able to open them back up. The black screws on the outside of the shell are the most prone to stripping. Goodluck! If you've never done something like this before definitely expect this to be an hour or two project, definitely doable though even if you're inexperienced.
D**Y
Well designed
I loved how great these turned out. Definitely recommend this product.
I**A
Impressed!!
got really impressed on how it ended up looking as soon as i finished. The price it’s ok by also everything that comes with, all the new buttons, tools and screws (which I was concerns because I tend to strip it). The size I’m not bother because it’s the same as the switch, Doing the swap was fairly easy, the only detail that I saw was that where the battery sits it lacks of glue to maintain it there without issue, but that’s alright. As soon as I finish it, I loved the color and how it looks. Also it feels very nice and the new buttons rocks.
L**S
Grazie ad Extremerate, potrete rendere la Switch decisamente fuori dal comune! Al momento, infatti, Nintendo, escludendo i Joy-Con, non sembra intenzionata a colorare più di tanto questo bellissimo dispositivo, adottando, principalmente, poche sfumature di grigio (e, sinceramente, non ne capisco il motivo). Questo kit è stato realizzato ottimamente: ogni shell condivide lo stesso identico spessore e la stessa identica sagomatura dell'originale. I colori sono bellissimi e la perfezione del taglio e delle dimensioni non compromettono in alcun modo la funzionalità dei controller in generale. Tutto è bello, tutto è fantastico ma, l'altra faccia della stessa medaglia risulta non alla portata di tutti. Per applicare queste cover bisogna, per forza di cose, privare i Joy-Con della loro integrità, smontandoli completamente. Ciò potrebbe risultare piuttosto complicato e, se non si ha esperienza, si rischia di rovinare definitivamente i controller trasformando il bidone dell'immondizia nella loro nuova e confortevole custodia. Oltretutto, qualsiasi tentativo di accedere all'elettronica dei dispositivi in questione invaliderà la garanzia degli stessi qualora fosse ancora valida. Bisogna stare molto attenti a maneggiare con cura ogni singola parte, scollando delicatamente tutto ciò che risulta incollato e, per quanto riguarda il riassemblaggio, ricordarsi gli step a ritroso evitando di stringere troppo le viti con il rischio di spanare le sedi di plastica (forse un po' troppo deboli). Questo lavoro mi ha saputo donare una grande soddisfazione. Adesso i due Joy-Con che avevo acquistato usati sono praticamente rinati, diventando identici come colore al primo Game Boy Color viola atomico che mi era stato regalato nel '98. L'unica pecca di questo kit risiede nella shell del Joy-Con sinistro. Il cilindretto della vite dorata, quello in alto a sinistra, adibito a serrare la rispettiva levetta analogica, risulta, a differenza di tutti gli altri, particolarmente incline alla spanatura. Consiglio di prestare molta attenzione nello stringere questa specifica vitarella con delicatezza e sensibilità. La modifica in questione richiede esperienza, perseveranza e, nel caso i Joy-Con fossero ancora in garanzia, anche una buona dose di follia! Non pensate di acquistare questo kit con un miraggio spensierato... valutate bene ciò che state per fare. Ogni cosa andata storto, inevitabilmente, vi si ritorcerà contro. 👍 Prodotto consigliato a chi se la sente di rinnovare controller molto rovinati o non più in garanzia. 👎 Prodotto sconsigliato a chi non ha molta esperienza nello smontare dispositivi elettronici o la cui garanzia sia ancora valida.
M**S
Bought to replaced the damaged Joy-Cons for my Switch. The original ones were third-party clear transparent but due to the previous owner causing liquid damage to one of the joy-cons and subsequent failed repair work to rectify their given condition and subsequent damage thereafter, so they were sold to me as is (in fully working order however) only described as "needing a clean due to being gunked" These replacements shells are of a better quality in comparison and added with the slight blue tint in colour are more eye catching. Slowly going through the long process of replacement (like for like) and changing the old shells for the new, I kept the screws that were not damaged by the previous owners repair and the stripped head screws were just replaced with the same sized screws supplied with this product. The only main difference is that the four largest black screws that hold the front and back shells together are now Philips head screws (supplied with this product) not the original nintendo tri-wing type screws. A few reviewer have complained about this products being of subpar build quality and easily damaged, this is not the case (in my instance), if you take your time and use the right amount of force to secure the new screws into place (you will have to apply a little more force than usual) I had no issues with damage to the screws nor the plastic parts, the new screws with have to tap into their new respective placements needing slightly more torque in their fixings. Due to how delicate the ribbon cables and subsequent wires for the rumble motor and battery packs within the Nintendo Joy-Cons it is advised to watch as many YouTube Videos of how to dismantle and (of course) reassemble each respective Joy-Con safely, I also used IFixIt's website as a visual cue for the step-by-step process on confidently taking the parts out without damaging them. Each Joy-Con replacement took about forty-five minutes to exchange the set over and in most cases wasn't too difficult to achieve barring one or two annoying ribbon cable mounting points that are hard to access, overall I really enjoying the process of shedding the old parts for the new, also how the colours of the buttons are very reminiscent of the Nintendo SNES era button colour layout too
C**Z
Está muy bueno el color, la sensación a la mano es buena y se siente de calidad. La textura no es la misma que la carcasa gris original, está es menos resbalosa, se siente como al interior de las tapas de las calculadoras científicas (creo es una comparativa que todos se pueden imaginar) pero un poco más suave. Los botones incluídos no me gustaron, prefiero los originales y, en mi opinión, se ven mejor de esta manera. El desarmador incluido es decente, suficiente para realizar este proyecto, no es necesario comprar un buen kit de desarmadores para hacer esto como muchos sugieren, a menos de que vayas a hacer esto múltiples veces, entonces si conviene gastar el extra. Incluye un juego extra de tornillos y resortes en caso de que pierdas alguno y me pareció un detalle increíble, aunque yo reuse los tornillos interiores pero si cambié los exteriores, ya que son un poco más largos (por algo será) y son philips (+), mucho más conveniente. El proceso no es para nada complicado, lo hice mayormente por pura intuición y no tenía nada de experiencia con este tipo de cosas, además es la ocasión perfecta para reemplazar los joysticks so presentan drifting. Eso sí, por alguna razón dejo de funcionar el botón SL de mi joycon izquierdo, pero fue mi culpa, no uso los joycons individualmente, así que realmente no me importa.
D**T
Da ich ein Paar Joycons mit Drifting Problemen geschenkt bekommen habe und die Sticks sowieso gewechselt werden mussten, habe ich gleich dazu dieses Gehäuse bestellt um einen vergilbten 90er Retro Look zu bekommen. Verarbeitung der Bauteile in Ordnung. Der Mitgelieferte Schraubendreher war qualitativ gut. Der komplette Umbau hat bei mir ca 3h gedauert. War auch das erste Mal, sodass ich sehr vorsichtig umgebaut habe.
C**N
The installation was a lot easier and pain-free than I expected. These shells are very good quality and have a smooth finish to them. The shells come in a nice box with almost all the tools you need for the swap. It comes with a screwdriver with two screw bits, a Philips one and a triwing one. Spare springs and screws are all included and even includes long Philips screws that can replace the stock triwing screws which are prone to stripping. However you do still need a prying pick and a tweezer. The actual installation is very easy and I can give some tips: - you can use a credit card instead of a prying pick - twist the screws tight so that the buttons stick out of the shell but also make sure not to over tighten them so that they do not strip the screw hole. - the right joycon is harder because it has a shorter cable for the shoulder buttons and has infrared sensor stuff in it as well. - use two youtube tutorials instead of one so that you can get a perspective of both, I used fetching tech's tutorial and dammit jeff's - the cable for the shoulder buttons are hell to connect - you can fold normal tape to make it double sided and keep the battery from moving around - don't bother with disconnecting the rumble motor from the motherboard, it is very stubborn - test all the buttons before you close it up the installation also somehow fixed the arrow buttons feeling off after playing tetris with them
Trustpilot
Hace 1 día
Hace 2 semanas