Transform Your Entryway with Style! 🌟
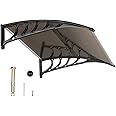
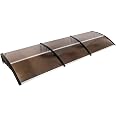
The Outvita Window Awning is a modern, durable canopy designed to protect your doors and windows from the elements. Made with a 5mm clear hollow polycarbonate panel and sturdy aluminum frame, it offers easy installation and year-round protection from rain, snow, and UV rays. Its sleek design complements any outdoor decor, making it a perfect addition for both residential and commercial spaces.
Item Dimensions D x W x H | 35.4"D x 39.8"W x 9.8"H |
Item Weight | 6.17 Pounds |
Style | Modern |
Pattern | Solid |
Color | Black |
Fabric Type | Aluminum |
Material Type | Aluminum |
Required Assembly | Yes |
Operation Mode | Manual |
B**5
Nice awnings
Nice looking, lightweight awnings
E**
Genial este producto
Genial este producto, realmente supero mis expertativas, la calidad excelente, facil de seguir sus pasos para armar. Es muy util le aseguro no se arrepentira de ordenar y si es lo que necesita ordenalo ya , se lo puedo garantizar. Llego antes de lo previsto y en perfectas condiciones de embalaje
A**R
Installation tips
The installation instructions are pictorial and brief. The mounting hardware consists of 4 masonry expansion anchors. A 3/8" diameter masonry drill bit is needed to install these. (I recommend finding an online video for installation of the type of anchor supplied.) I also recommend using the cardboard box as a template. Tape it to the awning brackets and punch holes at the top two bolt holes. Then tape the template to the wall and drill the holes. Once the top bolts are installed, drill through the bottom holes in the brackets and install the bottom bolts.
A**1
Great light weight awning!
I received two of these today. They are easy and lightweight to handle.****Warning!*****The instructions are just pictures and are lacking for a better term for installation.The steps should be written out like this:1. Assemble parts A (remove protective films on both sides first) to C, and second part A to C, having part C centered.2. Install parts E & D to each end.3. Attach part B (2) to each end of assembly from step 2That's the easy part without instructions.4. Attach screws F(4) into the holes on each side of part B5. Attach screws G(4) into the holes under each side (there are holes on the underside by the front end), and attach underneath on the back end where part B plastic covers part E.6. Find the center of your door, mark it, and then measure 19" off center on each side, and ~7'-8' from the floor on each side. Measure 6" below the previous mark for the bottom hole.7. Drill with 3/8" drill bit ~3" deep. Chaulk all four holes.8. Place the awning over the holes, insert part H through part B holes, and into holes in the wall (may require hammering to insert into holes).9. Tighten bolts by hand first, then use a rachet with a 9/16" socket for the top bolts, you can use a cordless drill with a socket adaptor, and tighten the lower bolts to snug.10. Use a ratchet to ensure all bolts are snug and tight.11. Run a bead of clear caulk along part E where it is against the house.*** Now that is how instructions are made!!***
C**S
Flimsy
Flimsy. Forget wind, this thing couldn’t stand upto harsh language!! So we went to return it and discovered that we were expected to pay shipping back to the tune of 30$!!????!!! Nope. Just put it in the trash bin where it belongs. Do not bother with this useless product.
C**D
Clear top gets yucky
The clear top gets yucky fast, and it eventually gets cracks and holes in it. Other than that, it’s fine, although I wish it protruded out a little further. The width is good.
L**I
Looks great easy to install
Wasn’t that hard to install I did it myself
C**H
Surprisingly rugged! Excellent value.
We live in the Northeast, and have had above average snow, freezing rain and icicles. This awning has held up to everything Winter has thrown at it (literally). Hoping its sun-shading abilities are as impressive, as it shades a west-facing window. Excellent product for the value.
Trustpilot
Hace 2 días
Hace 3 semanas