


🖨️ Stick it, print it, love it — Magigoo makes your first layer flawless!
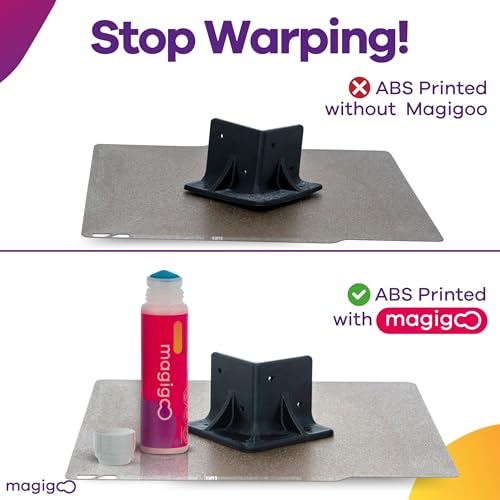
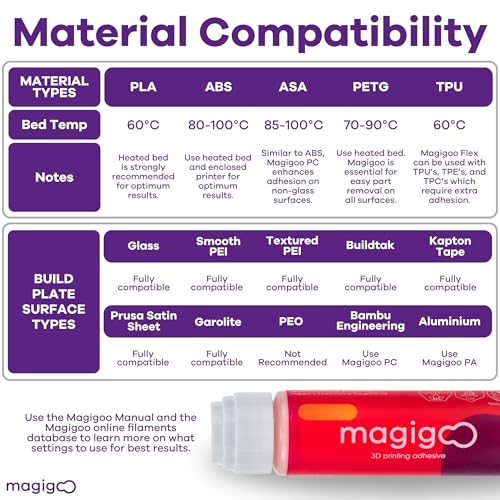
Magigoo MO2016 is a premium 3D printer adhesive designed to eliminate first-layer print failures by providing reliable adhesion across multiple filaments (ABS, PLA, PETG, HIPS, TPU) and build surfaces (Glass, PEI, Buildtak, Kapton, Flex Plate). Its easy-to-use, odorless formula supports over 100 prints per application, reduces warping, and ensures effortless print release once cooled, making it an essential tool for professional and hobbyist 3D printing alike.


| ASIN | B01N2JGTWJ |
| Best Sellers Rank | #1,507 in Industrial & Scientific ( See Top 100 in Industrial & Scientific ) #21 in 3D Printer Accessories |
| Brand | Magigoo |
| Color | Colourless |
| Date First Available | November 20, 2016 |
| Global Trade Identification Number | 05356660999303 |
| Item Form | Liquid |
| Item Package Quantity | 1 |
| Item Volume | 50 Milliliters |
| Item Weight | 0.004 ounces |
| Item model number | MO2016 |
| Manufacturer | Thought3D |
| Material | Flex Plate / Glass / PEI / Buildtak / Kapton, PLA / ABS / HIPS / PETG / TPU |
| Package Information | Bottle |
| Product Dimensions | 1.38 x 1.38 x 6.69 inches |
| Special Feature | Magic Release, Versatile Bonding |
| Specific Uses For Product | 3D Printing, 3D Printing Materials, 3D Printing Surfaces |
| Unit Count | 1.6907 Fluid Ounces |
| Water Resistance Level | Water Resistant |
B**L
This stuff really works! But be careful ....
I've been using Magigoo for about 3 months, my printer runs almost non-stop and I can say without reservation, this stuff works splendidly. I've only tested it using PLA, PLA+, and PETG so far. Hopefully it will work just as well with TPU and ABS. A couple of things I've learned along the way: 1. Be careful you don't squeeze the bottle too much, or the applicator cap will pop off the bottle and you'll have this stuff everywhere. I shake the bottle really well, place the applicator on the bedplate and push gently to get the goo to flow to the pad on the tip. You only need to do this occasionally as a little goes a long way. If necessary I will GENTLY squeeze the bottle, but only if the applicator is firmly against the bedplate. I haven't experienced a bottle blow-out as others have described but I can see how this could easily happen. Use care and you won't have a mess on your hands! 2. At first I was cleaning the surface with warm water after every print, but it wasted a lot of product. Start with a clean, dry bedplate, wipe it down with isopropyl alcohol (optionally, just makes sure the surface is oil-free), and apply the product in a uniform manner. Don't worry if you have overlaps and bubbles - once the product dries it actually aids adhesion and won't make a significant impact on your print. Once I've coated the bedplate for the first time, I'll let it air-dry and then apply a second layer going at right angles to the first, and then kick on the bed heater to set the product well. 3. WAIT FOR THE BEDPLATE TO COOL DOWN before you remove the print! I wait for the plate to cool to at least 40 degrees C before prying the print from the plate. This will make it much easier to remove the print and it lessens the "damage" to the adhesive's layer. Some of the product will adhere to the printed parts, this washes off with warm water without problems. 4. I use a razorblade scraper to gently pry the printed parts from the plate, trying not to scrape the adhesive off the plate as much as possible. You will see marks on the plate where the print came off - this is great because it means the adhesive worked! 5. I spot touch-up the marks from the previous prints, and I've found that multiple layers of the product seem to work better and need less touching up over time. You don't need to wait for the bedplate to cool to room temp before reapplying the product in small areas, it just dries more quickly. The main thing is don't be in a hurry to wash the bedplate and reapply - it wastes the product and is not needed. Like I said above, multiple layers work better that just one. I've been printing for days with just touching up spots and it's been holding my parts to the plate like a lioness holding her cubs :-) I like this product because it's relatively inexpensive, it has no odor (not to me anyway), it's easy to apply and touch up, and washes off the bedplate and printed parts with warm water. On one occasion, the printed part was a large, flat plate and in that case I removed the print in the sink with warm water. It was stuck so well I was afraid I'd break the print or the glass bedplate, but under a little warm water the print just slid right off. If you use these techniques I've discovered that one small bottle with last for quite a while.
B**E
Works great, definitely recommended.
I've been 3D printing quite a while and tried pretty much everything to get prints to stick to the bed. Blue painters tape, Kapton Tape, Hairspray, Glue stick, Acrylic, Buildtak, Clean Glass. For the most part that all work to some degree. Blue tape works, but it wears off after a couple of prints and hopefully you don't press to hard into the tape and it just becomes part of your print. Kapton Tape, I don't think I ever got this to work. Glue stick, works, sort of. Parts stick kind of, and when it cools, they still stick, it's glue. Acrylic, umm. It melts and warps eventually. But you can print on it for a bit, careful don't get the nozzle too close! Hairspray, parts stick, for maybe 1 or 2 prints, and they still stick when it's cool. Hopefully you didn't put too much on or spray the rest of your printer too. Buildtak, pretty much a waste of whatever it is. Parts would stick to it and become one with it. Unless you just barely drop the filament onto the stuff, in which case you get a rats nest for a first layer. Clean Glass, has been the winner for me. So normally when I print on clean bare glass, I have to clean it and make sure the bed is perfectly level. I mean perfectly level. So I have to do this pretty much every print, maybe every other one. PLA sticks at 55C and float off when below 40C. Until you want to print with ABS or PETG. PETG Still sticks really well to the bare glass at 80C, sometimes it sticks so well the glass comes off with the part! ABS I don't print really. But I'm pretty sure it won't stick well without an enclosed chamber and 100 other conditions. That's where Magigoo comes in. Parts stick like buildtak when it's hot, and nearly float off when below 30C. With the Magigoo, I've been able to put an even layer on and launch about 5-10 prints without touching the bed. This, is kind of a game changer. This makes me a bit lazy, but is another piece of the puzzle to being able to launch prints remotely and knock the print off with the nozzle when it's done. Also, parts that have a very small footprint, I would normally use a raft and support, with Magigoo it's really not needed. Probably save $5-10 in extra filament right there. The fact that it lasts more than 5 prints per application, that's pretty huge. Then it's going to extend the life of your glass as well. How much is that worth? This will give you plenty of prints for less than $20 in Magigoo. I think it's totally worth it. Is it hard to apply to the bed? I think it's hard to re-print a part a few times because the print isn't printing perfect in the first few layers. And what if you're not there? How you going to clean off that little bit?
F**O
Fantastica! non si stacca piu niente! Non a buon mercato ma dura un sacco quindi ok
Y**H
Quality is good
W**6
Sometimes I just can't get my parts to stay attached to the bed, especially with PETG and ABS. Even with PLA, sometimes it just doesn't happen - especially when the contact area is small. This stuff works a treat, significantly increasing the chance of good first layer adhesion. It lasts for ages because it generally only needs a thin layer to be applied once and one can do lots of prints. Over time it needs reapplying - either straight on top, or wash off previous layer with a damp cloth (water soluble). It won't completely solve ABS/PETG warping issues, but it helps a lot - the bed adhesion can be so strong that the parts themselves break (layer separation) during printing rather than coming off the bed - and that's fixable with a soldering iron. Little tip - first use requires the seal to be broken by pushing the tip down onto a hard surface until it clicks. Also make sure the tip is nicely libricated with the liquid before trying to apply, otherwise you can damage the felt and then scratch your bed.
I**N
Magigooは凄い。 よく張り付いて、モデルが歪みません。
E**S
Lo utilizo con ABS sobre cama caliente de cristal a 108º y pega super bien. Cero warping con ABS de SUNLU y de FORMFUTURA. Lo malo es que hay que limpiar la cama despues de cada impresión (esponja con agua y trapo humedo), y que suelen quedar restos en las piezas. Si te pasas de producto en la cama te hace un "pegote" en la pieza dejando marcas. Hay que aplicar una capa fina y homogenea, con cuidado de no dejar zonas con excesos.
Trustpilot
Hace 2 días
Hace 4 días


