🔋 Power Up Your Projects with Confidence!
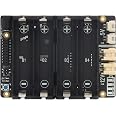
The Geekworm 12V/5V Dual Output Universal SBC Stackable Uninterruptible Power Supply UPS Shield X-UPS1 is a versatile power solution designed for various Single Board Computers. With a maximum output of 3A and compatibility with a wide range of devices, this UPS shield ensures your projects run smoothly and efficiently, even during power interruptions. Its stackable design allows for increased output and battery life, making it an essential tool for tech enthusiasts and professionals alike.


| Material Type | Acrylic |
| Battery Cell Composition | Lithium Ion |
| Output Current | 3 Amps |
| Output Voltage | 12 Volts |
| Output Wattage | 72 Watts |
| Wattage | 72 watts |
| Connector Type | VH3.96, XH2.54, USB TypeA |
| Number of Outlets | 6 |
| Frequency Range | 50/60 Hz (± 3 Hz) |
| Maximum Power | 72 Watts |
| Voltage | 24 Volts |
| Amperage | 3 Amps |
| Form Factor | Rack |
| Color | black |
| Item Weight | 89 Grams |
C**N
Great little UPS unit for SBCs and Raspberry Pi projects
This is a really nice little unit with a lot of flexibility. You can "stack" additional modules to double the capacity, and it has both USB and raw power output headers. Its shortcomings are minor, but worth noting:1. It uses kind of an odd mix of connectors. This is pretty common to help folks avoid mixing up their wiring but it's got VH3.96 for 12V, XH2.54 for 5V, two USB, and one DC5521 power input. The problem is, it only includes ONE of each VH3.96 and XH2.54 output cables but it has two ports for each level, and no input power cable is included. You'll need to source extras of these on your own, and naturally, you can only buy these things in 10-packs for any reasonable price (and delivery window). For the price these probably cost the manufacturer, I would happily pay a dollar or two more just to have a "complete" kit to use right away.It would also have been nice to have a USB power input option, although the board is pretty packed already - it might be hard to fit that converter.2. Mounting options seem like an afterthought. You get a pair of acrylic panels that cover the top and bottom so at least it won't short out sitting on a metal table, or have something fall on it. But there are no other holes, and these holes are pretty small. So your only options are 1. double-sided tape (which works, but this thing is heavy, so don't plan to mount it vertically or in any kind of warm environment where the tape might let go), 2. zip ties (crude, but effective), 3. removing the protective covers and trying to make the tiny holes work for you.3. There is a battery-level indicator but the button that activates it is in the opposite corner of the board, which makes it kind of useless or at least hard to use easily.I'm not returning it - I made it work well for my needs. But if I had a wishlist for a V2 it wouldn't be hard to improve with a few simple changes: 1. Include two more output cables, 2. Drill four more mounting holes in the bottom plate so at least there's one more attachment option, 3. Remove the useless battery level indicator and if POSSIBLE put a USB input port there. It would be 5-star perfect IMO.
C**E
Easy!
Operates as expected
A**R
High pitch, lower current than promised
Got 2. Original impressions were good. After further testing, turns out it cannot deliver promised current and has a high pitch whine.Originally used one each for power backup for a couple raspberry pi 4. I then upgraded to a zima board.When it was moved into a quiet room, you can now hear a pulsing high pitch whine coming from the boards, regardless of load draw. I also stacked the boards to double the current output (as listed in the ad), however, I started having power issues when two HDD tried to spin up. Hooked the stacked boards up to a constant current load, got 11.92v when drawing 3A, and 9.71v at 6 A.
M**L
Solid UPS but need documentation on how to interface logic
This is a well built and compact 18650-based UPS for microcontrollers. I would immediately upgrade my rating to five stars if there was documentation available on how to connect to the charge management and battery capacity components over I2C, though. There is an 18-pin header for “stacking”, and screen shots on the Amazon page implying parameters like supply voltage, current, and power are accessible to a Raspberry Pi connected to this device but there are no instructions, or pin-out diagrams that I can find showing how to connect a RPi to this ther that as a power supply.
Trustpilot
Hace 2 meses
Hace 1 mes