🌟 Elevate your outdoor vibe—shade, shelter, and style in an instant!
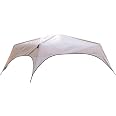
The Coleman Back Home Screen Canopy Tent offers a roomy 12x10 ft shelter with UPF 50+ sun protection and bug-blocking screened walls. Designed for quick 3-minute setup, it features durable double-thick nylon fabric and a sturdy alloy steel frame. Perfect for picnics, tailgates, and outdoor events, it includes two large doors for easy access and a wheeled carry bag for effortless transport and storage.


| Brand | Coleman |
| Material | Nylon |
| Color | Brown |
| Item Weight | 45.2 Pounds |
| Recommended Uses For Product | Picnic |
| Product Dimensions | 48.03"L x 13.78"W x 10.24"H |
| Ultraviolet Light Protection | True |
| Frame Material | Alloy Steel |
| Closure Type | Zipper |
| Water Resistance Level | Water Resistant |
| Pole Material Type | Alloy Steel |
| Coverage | 90 square feet |
| Number of Guylines | 4 |
| Floor Area | 120 Square Feet |
| Max Ceiling Height | 96 Inches |
| UPC | 076501052442 607983727414 |
| Global Trade Identification Number | 00076501052442 |
| Assembly Required | No |
| Item Package Dimensions L x W x H | 48.5 x 13 x 10 inches |
| Package Weight | 24.49 Kilograms |
| Item Dimensions LxWxH | 47.8 x 12.2 x 9.45 inches |
| Brand Name | Coleman |
| Country of Origin | United States |
| Warranty Description | See manufacturer |
| Model Name | 2000028003 |
| Suggested Users | unisex-adult |
| Number of Items | 1 |
| Manufacturer | Coleman |
| Part Number | 2000028003 |
| Model Year | 2016 |
| Style | Contains Pfas |
| Included Components | 12 X 10 Instant Screened Canopy, Wheeled Carry Bag |
| Size | 12 x 10 ft |
| Sport Type | Camping & Hiking |
R**A
Extremely useful and well-constructed
After reviewing many of the other product reviews for other screen rooms, I decided to give this one a try. I'm glad I did. I found this Coleman screen room to be made of very good materials, easy to set up (even for one person) and it functioned very well - even in bad weather. This screen room is well-engineered and there are many different features which make setting up and using it a great experience.The frame, roof and screen all come separately packed. After removing the frame from the [well-made] carrying case, I was able to extend the frame easily to [most of] its full 10 x 12 size on my own simply by allowing one foot to dig into the ground a bit and act as an anchor. I left it partially collapsed simply to make it easier to attach the roof. If you have two people doing this it would be even easier - but this approach worked for me. The roof attaches to the frame with velcro strips that are large and secure (I would later put these to the test in high winds - thank you velcro!) and takes just a few moments. After attaching the roof, I extended the frame to its full 10 x 12 size without any problem. To secure the roof and lock it in place, simply push up on the handles on each leg and the roof locks into its full, arched shape. Having some experience with shade covers, I found this to be remarkably easy to do. Once the roof is on and the frame locked into place, the legs extend to their full height by just pushing in a trigger-like handle and pushing down on the legs. They slide easily and lock into place easily. When all the legs are fully extended, the first thing you'll notice is that the roof is very high. A very tall adult will have no trouble standing in this. This part of the process took less than 10 minutes.Putting up the screen is equally easy. It has two zippered doors in it and it came with both already in the zipped configuration. Unzip one (or both) of the doors and it will become one long screen wall (or two if you unzip both doors). The screen attaches under the roof material where each leg is with two simple hooks. Move from leg to leg pulling the material tight so that the reinforced seams match up with the poles. I found that I had to adjust the position of the legs here and there to make sure that they ended up aligning with the reinforced seams in the screen walls. (it was a good thing I hadn't anchored the legs at this point). The screen has a heavy duty barrier at the bottom (dark grey in the picture) which acts as a heavier barrier against crawling things ( I presume). There's a small hook at the bottom of each reinforced seam that attaches to a hole in the lower part of the leg and which secures the screen. This whole process took less than 10 minutes.The screen room comes with six ~12" steel spikes which are used to anchor the legs. The set also comes with 6 lighter tent stakes which are designed to anchor the screen by passing them through durable cloth loops located at the bottom of each reinforced seam. The whole set up can be anchored by using the small tent ropes that are located at the top of the canopy and attached to the tent stakes.So, here are some of the details about how it worked:1. It was very roomy and we had no problem sitting six adults in chairs around the perimeter and also had a six foot table along one wall which we set our stove up on.2. The ceiling is high and we ended up stringing lines to hang clothing - and were still able to get around well.3. In high winds, I was glad it was anchored down. When I say "high winds" i mean that we got caught in the leading edge of a massive storm in the Appalachians and the winds were throwing around other people's tents. the seal between the roof canopy and the screen didn't open and remained sealed against the rain we had.4. Rain did blow in from the sides, but the screens did a remarkable job keeping most of it out - it was kind of like a little mist rather than the torrent of rain that the people next to us had to deal with that didn't have screened in protection.5. In the very heavy rain, the roof - which the manufacturer doesn't claim is waterproof - did great. We experienced very little dripping (and it was a heavy rain) and most of that came through the seams. I plan to apply waterproofing to the seams as a minimum and may just spray the whole roof.6. Because the screen fits so tightly around the structure, the bottom barrier held its form and kept out some of the water from puddles that had formed around the site. I wasn't expecting that - but it worked.7. Before and after the rain, the structure provided a great place to sit in the shade, completely free of bugs. As long as you keep the doors zippered, we didn't have any problem keeping out flys, mosquitos and no-seeums. We did note, however, that while we were setting it up, some of those got in before we could secure the screens and so they were trapped in there once we got the screens up. A little bug spray took care of them and we didn't have any issues thereafter.8. Sitting under the canopy inside the screens, we definitely were able to feel the breezes (reduced) that were in the area. So, it was bug-free and comfortable.Taking this thing down was as easy as it was to set up. There were several people in the campground that came over and wanted to know where I got it and who made it because they had seen one person put this shelter up and one take it down. I chose to leave the roof attached when I folded the structure up so that it would be easy to set up again next time. You'll want to be careful doing this when you put it back in the case because the zipper could catch on the roofing material and tear it.All-in-all, I think this is a great product and would highly recommend it.
P**Y
great product
I loved this canopy tent and used it for many many years.
B**.
Tough & Durable
I bought this canopy around 2016. I use it for dinner and poker when me and the guys go camping. It has been through at least 4 severe thunderstorms, and just this past weekend, in the middle of the woods, it went through a hail storm. The radio went crazy with the severe thunderstorm warnings, telling us that hail would be large enough to damage cars, and to take refuge in the lowest point in your house. My buddy asked me if the canopy had a basement! LOL Then the storm hit. The hail came first, and the biggest pieces were dime to quarter sized, but mostly dime sized hail. I always use the 10 inch spikes in the canopy, as opposed to the little ones that come with it. They work. When the wind gusts kick up, we had to unzip both doors to allow the wind to more easily blow through the canopy. We once had a storm so bad, that me and a buddy had to hold on to the frame, to keep it from blowing into Lake Erie.The point I am making, is that my screened canopy has been battle tested, and it still does the job. I spray it with Kiwi Camp Dry on the 1st trip, every summer, and it has never failed to keep us dry, unless the wind was howling so bad that water was coming through the screen. Now days, as you can see in the picture, it is a little lopsided from various storms, and other abuses that we may or may not have done to it, after a night of drinking, but it still does what I bought it to do. Keep out the bugs, and keep us dry.The only con, is that there is not a person on this Earth, that can set this up in 3 minutes! It takes about a half hour to set up properly. That is not bad. A half hour to set up a beautiful canopy, that will keep you mosquito free, and dry for the whole weekend, or however long you happen to be using it for. I am going to retire my canopy after our winter deer hunting trip, and that is only because I like my camping equipment looking great, for when I am camping among folks in the state parks. Right now the canopy isn't getting too many style points, but it always delivers the results. I'll be passing the old canopy down to my kid for hunting, and I'll have a new one for next camping season...
Trustpilot
Hace 2 meses
Hace 5 días