🛠️ Seal the Deal on Home Repairs!
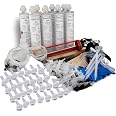
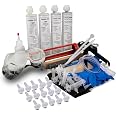
The 20' Fast Set Concrete Crack Repair Kit by Applied Technologies is a comprehensive solution designed for DIY homeowners. It includes Hydra Stop 300 Polyurethane Foam, which expands to fill cracks and prevent water damage. This waterproof sealant is easy to apply and comes with all necessary components for effective repairs, ensuring a durable and lasting solution for cracked walls.
| Material | Polyurethane |
| Brand | Applied Technologies |
| Style | Compact |
| Item Weight | 11 Pounds |
| Item dimensions L x W x H | 14 x 6 x 14 inches |
| Compatible Material | Concrete |
| Water Resistance Level | Waterproof |
| Item Form | Paste |
| UPC | 051497220846 |
| Unit Count | 1 Count |
| Number of Items | 1 |
| Surface Recommendation | Wall |
| Manufacturer | Applied Technologies |
| Part Number | AT-2W543214 |
| Item Weight | 11 pounds |
| Product Dimensions | 14 x 6 x 14 inches |
| Is Discontinued By Manufacturer | No |
| Shape | Rectangle |
| Item Package Quantity | 1 |
| Batteries Included? | No |
| Batteries Required? | No |
K**L
Fantastic repair, but not for the faint of heart
We moved into our house about a year ago. The crack in our basement wall was a concern, but not enough to prevent us from buying the place. The previous owner said it leaked water every Spring but not enough to flood the basement. Our plans were to turn the basement into actual living space, so we decided to do something about it. First, I researched various companies that repaired and waterproofed foundations. Then I started looking into DIY solutions. Obviously, the DIY approach is much less costly. After looking at a few videos and reading about this type of repair, we took the chance and bought this kit.Our crack was 9 feet long and extended from the top of the foundation wall all the way to the floor, and it was all the way through to the outside. We are fortunate that it showed no signs of movement over the past 17 years since the home was built, and it was structurally sound. I am a bit of a handyman, but I never had any experience with this type of thing. Before starting, I was skeptical that it could truly work, but I kept an open mind and followed the directions. First, I carefully notched out the crack with a grinder to make a small "V" groove in the surface. Then I took a wire brush to the crack to clean out any loose debris. To err on the safe side, I placed the ports 6 inches apart and proceeded follow the remaining instructions. It is important to prepare everything ahead of time. I wish I had put a bit more time into prep work, because the clean-up would have been easier. Both the epoxy and polyurethane will get on you and your clothes despite your best attempts to keep clean, so don't wear anything you want to keep perfect. It is impossible to remove it from fabric. Lay down a large piece of plastic or something to collect any drips and overspills. It is a PITA to clean-up after the project, so take some precautions.As I watched the polyurethane permeate the crack, I was impressed with how fully it filled everything. It even forced its way all the way through the foundation to the outside. This stuff really expands to fill any void. That is why it is so important to make sure there is no gaps or crevices in the epoxy that overlays the crack. If there is, it will ooze out and not fill the crack as intended.I let this set-up for a day or two before snapping off the ports, then I waited a week or more before grinding down the overlaying epoxy. It is quite impressive how well this looks and completely seals the crack.The real test came this spring when the snow melted and we received a lot of rain. There has been absolutely no water penetrating the foundation!This product may not be for everyone: I would not advise someone who is not familiar with basic DIY skills to attempt it. I also would not recommend this for cracks that are dynamic or moving. Otherwise, it is a great way to fix a crack in a foundation and save a ton of money in the process. This would have easily cost me a few thousand dollars had I hired a company to do it. As it was, I spent less than $300 with everything and a few hours of my time. My results are nothing short of awesome. I highly recommend this to anyone who has something similar to my issue. It get's an easy five stars.
1**3
Plan your moves
The is my first impressions, will update long term results after spring rains.1-clean very well. I wire wheeled with a grinder and is still seemed dirty but porous. Makes lots of dust (duh)1-glueing the ports is easy but be generous on the outside. I have faux stamped brick and it didn’t get into cracks easily. It’s a fine line of plugging the the port and filling voids2 -mix in small batches and prepare on cardboard and pitch when done. It dried VERY fast and about 5 minute comfortable working time. Prepare!!!!3- sealing the cracks is kind of a pain. Need a large amount but have to move fast. Mix with something bigger and sturdier than the wood provided. I eventually ditched the popsicle sticks and just used my finger /gloves to apply. Felt like I worked it smoother and evenly. Apply a generous amount because this stuff finds every pinhole (see photos)4a- DO NOT USE THE GUN PROVIDED, don’t think about it, don’t try. You are not different and no i’m not using it wrong. Get a better sturdier one. Dear god please don’t do it.4-heat the stuff in water like it says if have hairlines. Have your plugs ready, easily accessible. Have paper towel ready in small batches. Have a can nearby. Have something on the floor all over wider than crack. And most of all have someone there to just give a hand. Once this stuff starts flowing, it runs like hot honey, switching cartridges mid run gave me anxiety as it flings like water. Let pressure off the gun when switching holes.4c- press them caps on well, the foam expanding can pop them off. It expands a ton.Time will tell.
K**A
This was a very easy to use kit
This year has brought an unusually high rainfall to my area. For the first time ever I had water seep through a crack in basement. Foundation poured in 1986. Had this kit recommended from a carpenter I know who said all the foundation guys he knows use it.Pros -The instructions are very clear and easy to follow. The kit has everything you need if your basement is raw concrete. I had a sealer on mine, so I bought a concrete diamond disc for my angle grinder and brought it down to bare. I strongly recommend buying a vacuum attachment for your angle grinder if you need to do this as well. Concrete dust sucks, I used a vacuum attachment. There were more than enough ports and proxy paste to setup. In fact I have 2 of 4 tubes of proxy paste left. I wish this kit was 1 tube less proxy paste and one tube more Hydra 300 (see below). The caulk gun I got was pretty solid construction. I saw some complaints, but this one is way better than a generic big box store. I used it for a tube. It worked fine. I swapped to my nice ratchet one after, but you can easily do this job with the supplied one.Cons -This kit was perfect for my 7' crack (in picture) . There is no way you're doing 20' so I'm glad I didn't buy the smaller kit. I would have liked one more tube of the hydra stop to be extra sure, but it expanded thru to outside so I'm good but it was close. If you have 6' this is good to go. If you have 7' or more I would get additional tubes of just the hydra 300. Also theOverall this is a great product that sealed my crack from inside basement all the way thru to the outside. So I am very happy I used this and saved a ton of money hiring someone else to do it. This can be done in 8hrs by someone with no experience.
Trustpilot
Hace 1 mes
Hace 2 semanas