📦 Elevate your space with the ultimate media command center!
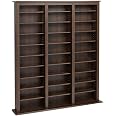
The Prepac Barrister 3 Column Media Storage unit features 27 adjustable shelves within a 63.75" tall, espresso-finished engineered wood frame. Designed to hold over a thousand CDs or hundreds of DVDs and Blu-rays, it offers customizable storage for books and collectibles. CARB2-compliant and backed by a 5-year warranty, this freestanding cabinet ships ready to assemble with included hardware and instructions.
Material | Engineered Wood |
Color | Espresso |
Special Feature | Large Capacity, Tall |
Product Dimensions | 9.5"D x 57"W x 63.75"H |
Shelf Type | unspecified |
Number of Shelves | 27 |
Room Type | Living Room |
Finish Type | Lacquered |
Assembly Required | Yes |
Mounting Type | Freestanding |
Recommended Uses For Product | unspecified |
Included Components | Hardware, Instruction Booklet |
Item Weight | 88 Pounds |
Brand | Prepac |
Style | adjustable |
Is Customizable | No |
UPC | 772398571331 |
Global Trade Identification Number | 00772398571331 |
Indoor/Outdoor Usage | Indoor |
Item Weight | 88 pounds |
Item model number | EMB-1200-K |
Is Discontinued By Manufacturer | No |
Weight | 63 Pounds |
A**R
Well Designed Quality Product
I have purchased a fair amount of furniture online that required assembly. In my experience, the first test that determines your happiness is the shipping journey. In fact, large and heavy product has an increased likelihood of arriving damaged. So well packed product is extremely important and I am delighted to say that Prepac did a commendable job protecting the product. I had no issues whatsoever with damaged parts. There have been some review complaints I read relating to sawdust in the carton, but it really was nothing a handy vacuum could not address.Assembly was simple and straightforward, there were no missing parts and the wood was finished perfectly. The instructions were basic and straightforward and maybe a bit more detail would have been welcomed to speed up assembly time. Also, having a helper for some steps may be advisable, but I assembled by myself without issue. The shelf configurations for various height needs are numerous. The unit is stable on carpet but I suggest securing to wall for safety and peace of mind as recommended in the instructions with the supplied hardware. A few other mentions. The product is shipped in two cartons, which I thought was a smart decision to stabilize weight distribution and reduce potential shipping damage. This model I chose has thicker vertical supports which can hide a DVD on the ends when storing vertically. Some may have issue with this, but I prefer the look of the thicker verticals and can live with this minor issue. In the unlikely event there are missing, damaged or defective parts Prepac has clear instructions to address this unfortunate situation. They state a 2 business day turnaround time for replacement parts.I am very happy with the product and absolutely recommend to anyone who desires an attractive product to store and display your DVD movies.
N**M
Great to store DVD collection
Used these for our DVD collection. Very well made. Easy to put together.
R**P
Good but not perfect media shelf
The Prepac Triple Barrister is a really effective media storage unit that, with some clarity from someone who has assembled it, can be assembled (hopefully) flawlessly. Use the provided instructions as a guideline but with the below adjustments1) Before you do ANYTHING, open your assembly parts bag (nails, dowels, etc) and count to be sure you have as many as are stated in the manual. I was 3 nails short and didn’t realize this until basically finished with assembly. Prepac has a parts replacement portal you. You can have any missing/broken parts shipped to you for free. Order anything you need ASAP.2) Before assembling anything, go ahead and put all of your dowels (wooden and plastic), cam locks, and the metal tips the cam locks screw onto for locking in their respective pieces the manual states. Put in everything EXCEPT the screws for the bottom, pegs for the shelves, and nails for the back panels3) Also before assembling hammer in the racks on the bottom that work as rubber sliders before scratching your floor. The manual shows these being hammered in AFTER you attach the bottom to the long peg boards, but it’s much easier to put these in before assembling4) Start from the bottom and lay out your 4 peg boards left to right (the left one has the cam lock in a different spot than the other 3, and the far right one only has pegs on 1 side (the inside)). When aligning these to screw in j from the bottom be sure there are dowel holes facing UP. These are for the decorative peg board coverings5) Attach your top by cam locks and immediately stand the unit up (it should be stable enough to do this)6) Here’s what the instructions DONT tell you that I wish I had done - put some pegs into all 3 sections and test your unit to ensure your shelves won’t be wobbly. The center shelf on mine is and it’s possibly that it’s misaligned…however you do have the option here of removing the top and SWAPPING the 2 middle peg boards to see if that fixes the misalignment. Again, doing this test now is critical as you can’t (shouldn’t) do it once you’ve nailed on the back panels. If your shelves are misaligned you can request replacements from Prepac to hopefully fix this. Don’t proceed any further until satisfied.7) Attach your decorative panel coverings (horizontal and vertical) via the plastic dowels as described in the manual.8) Flip the unit over for putting the back panels on. I recommend you start with the middle one because it’s easy to get it aligned with the peg boards (you want it covering the peg boards 1/2 way on either side. This way both side panels will be aligned as well).9) The diagram in the manual for the back boards is pretty poor because it only shows 3 boards, even though it’s really 3 sections, and each “panel” is really 2 boards taped together in the back. Each “panel” should use 20 nails (2 along the top, 2 along the bottom, and 8 along each side). This goes back to step 1 where it’s important for you to count your assembly parts because you will use all 60 nails.10) Before hammering ANYTHING I recommend for ALL REMAINING STEPS only hammering in ALL nails at the start 3/4 of the way in. Be sure you’re panel is centered top/bottom and side/side and you’re satisfied with the panel placement. This also allows you to see if the nails are straight or not. If not you could split the peg board. I had 59 of the 60 nails go in fine but one did just this. If you need to pull a nail you can do it easily now and re-spot where you want it. If you hammer them flush, you’ll have a tougher time getting them out (you could pry the panel loose with the back of the hammer but you run the risk of scratching it).11) I recommend hammering in the 2 top and 2 bottom nails of the middle panel first and offsetting them the way the manual describes. Meaning don’t center them in each piece of the panel, but have them closer to the corners (the manual says 2”). So get a tape measure and measure 2” from the left bottom corner and hammer. Repeat for the bottom right. Repeat for top left. Repeat for top right.12) If your offset the side nails 3” from both the top and bottom as described in the manual you should be able to get 8 nails along each side at roughly 8 1/4” between each nail and have them spaced pretty evenly. Put your top LEFT SIDE nail in 3” from the top and VERY close to the edge of the panel, maybe a millimeter away from the edge…you’re only sitting on half of the peg board you’re hammering into so you don’t have a lot of room for the nail to go in flush). Then hammer your bottom LEFT SIDE nail 3” from the bottom. From here measure the distance between the two nails and it should come out close to 58”. If you visually look at even spacing for 6 more nails it comes out to roughly 8 1/4” per nail. Work from bottom to top and put a nail in at those intervals (remembering to only hammer in 3/4 of the way and stay VERY close to the edge). You might want to do the last 2 nails roughly 8 1/3 so the spacing looks more even as it isn’t exactly 8 1/4 for true even spacing, just that’s really close and the easiest measurement to stick to.13) Repeat step 12 for the 8 nails on the right SIDE. Once all 20 nails are in 3/4 of the way take your other 2 panels and lay them on either side, be sure you have good centering left/right and top/bottom for all three panels. If not see where you need to adjust and pull up the nails, resented your panel, re-nail, and re-check centering. Once you’re satisfied you can hammer the 20 nails for the center panel flush.14) Repeat steps 10-12 for the left panel. Again only hammer in the 20 nails 3/4 of the way. A time saver here for the 8 nails on the side touching the inner panel is you don’t need to measure, just align the nail to the one right next to it on the center panel. Also for the 8 on the outer edge you don’t have to be quite as close to the edge since you aren’t sharing this peg board with another panel. You have more room to work with here. Check your centering and if comfortable, go ahead and flush the 20 nails for this panel.15) Repeat steps 10-12 for the right side panel, again you have a time save here not having to measure placement for the 8 side nails for the side touching the center panel. Once this is done you’re finished unless you want to attach your shelf to a wall. That I can’t help with as I didn’t do this. You can begin putting your pegs and shelves in.Hopefully this helped clarify some wonky manual steps and saved you from the headache/sinking feeling of getting to the end only to realize you damaged your unit hammering a nail in, it’s misaligned, or having wobbly shelves.If the manual and shelf alignment were more clear and so much of the finish wasn’t dinged I’d give it a 5. The touch up marker is nice but they should really put those thin foam sheets Atlantic puts in their media cabinet boxes to prevent some of the finish coming off during the shipping process. So it gets a 4
K**L
For my DVD movies.
Gotta get some room.
M**R
Love it!
No issues with shipping and no damage to product. Wood is beautiful and durable. Easy to assemble; stores all my manga, games, DVDs, blu-rays, 4Ks, accessories, and even a few VHS tapes that I had room for. If there was a scratch, it was an easy fix with the wood marker they provide in the packaging. I may buy a smaller one in the future for the last of my VHS momentos.
T**
Amazing/Stylish/Great Storage/Sturdy
DVD/CD Storage I had over 1100 dvds and needed storage. Bought 2. Easy to put together for my husband, looks very stylish and is quite sturdy. Extra shelves for different dimensions for all kinds of media Storage. Loved it so much, bought another for my CD collection. I very rarely do reviews, but felt I needed to because this product was better than I could have ever imagined. You can't go wrong.
L**N
Watch out
I have no clue what it looks like because they canceled the order. Hopefully the seller will communicate with you better because I got NOTHING ! The price is a lot as well for the product ! Good luck !
橋**朗
High quality in my opinion
you will have shelfs left over most likely but overall, the shelf is well made, thick wood and super easy to put together
Trustpilot
Hace 2 semanas
Hace 2 semanas