We remain fully operational. Our teams are working around the clock to ensure your deliveries continue safely.

Descargar la aplicación


Servicios al cliente
Sobre nosotros
Copyright © 2025 Desertcart Holdings Limited
Descargar la aplicación

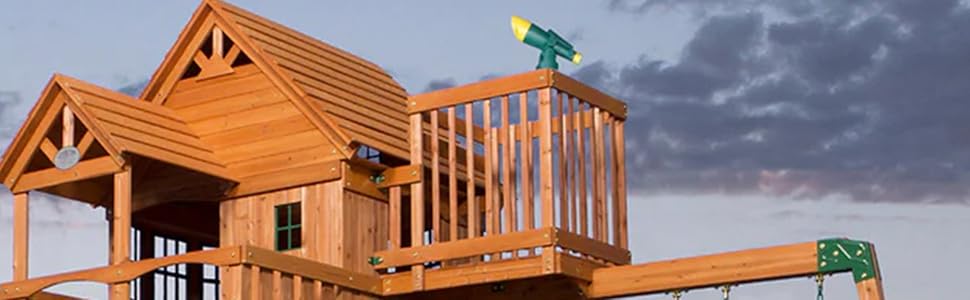
🌟 Elevate playtime with the ultimate backyard adventure fortress!
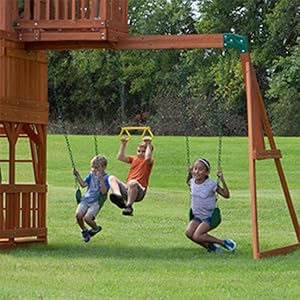
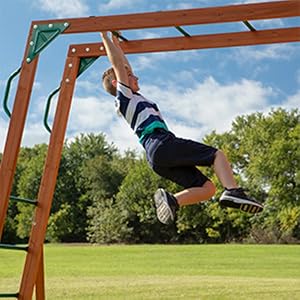
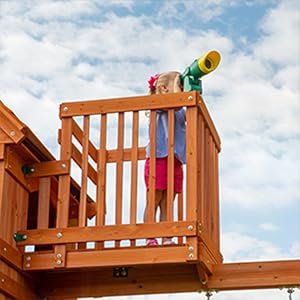
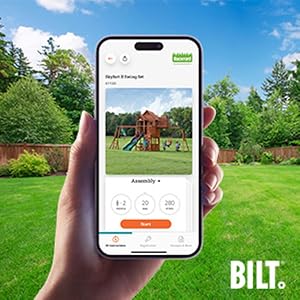
The Backyard Discovery Skyfort II is a premium cedar wood outdoor playset featuring a raised clubhouse with balcony and crow’s nest, multiple swings and trapeze, a 10-foot wave slide, monkey bars, rock climbing wall, sandbox, and picnic table. Designed for up to 15 children, it combines durable materials, safety-certified construction, and an interactive assembly process supported by the BILT app. Backed by a 5-year warranty, this playset transforms any backyard into a dynamic, imaginative playground that grows with your kids.


| ASIN | B0177AVE9G |
| Assembly Required | Yes |
| Best Sellers Rank | #181,300 in Toys & Games ( See Top 100 in Toys & Games ) #352 in Play & Swing Sets |
| Brand | Backyard Discovery |
| Color | Brown |
| Customer Reviews | 4.3 4.3 out of 5 stars (703) |
| Finish Type | Unfinished |
| Frame Material | Wood |
| Is Discontinued By Manufacturer | No |
| Item Weight | 710 pounds |
| Item model number | 6113D |
| Manufacturer | Backyard Discovery- Leisure Time Products, Inc. - Dropship |
| Manufacturer Maximum Age | 120.0 |
| Manufacturer Minimum Age (MONTHS) | 36.0 |
| Manufacturer recommended age | 36 months - 10 years |
| Product Dimensions | 201.12"D x 263.16"W x 148"H |
| Release date | January 28, 2020 |
| Set Name | Skyfort II |
| UPC | 752113060098 752113600911 |
K**R
Time consuming to build, but satisfying in the end
Time to build: 8 hours sealing all wooden parts in my garage 2 hours sorting all hardware into bags according to page of instructions 1 hour sorting all wood by letter and number 4 hours and two people to build all subassemblies 8 hours and 2 to 4 people for final assembly In total, about 23 hours start to finish. I used 1.5 gallons of Olympic clear wood sealant. Two people are enough to finish this, coordinating 4+ people was difficult. It helps to have one person in the fort at the end, to assemble the roof and crows nest, and it's sturdy enough. There were several moments we thought the instructions were wrong, only to realize we missed an important step or note. The details matter, and instructions make it clear how to place asymmetric parts. Most of them are asymmetric, requiring careful attention to detail. We removed a board maybe five times during the whole process, no sweat. The instructions are details and fun for the whole family. I can't imagine paying someone to do this, and missing out on the experience assembling it yourself! Leveling the ground was my biggest concern going in. I considered building a foundation, but ended up digging in about 3 inches at one end. Time will tell if I can drain the area properly to avoid rot. We may still add river rock and mulch. The final product is very sturdy and beautiful to look at. All wooden parts are high quality with almost no splitting during assembly. Kids love it, and we can't wait to share this with our friends. Cost was reasonable and well under what I've seen for similar playsets.
T**A
Methodical Layout is Key! I LOVE THIS SET!!
I really love this set. Does it take forever? SURE! But... here's what I did: After its arrival, my best friend and I used bedtime, and our massive garage, to lay everything out. Very first step? Print the PDF version (found online) of the manual, page by page. I just printed the actual steps pages, and not all the rest. So, use your "print pages" option to save yourself a few trees. Next, I purchased fold top, cheap sandwich bags and had a couple sharpies handy. Then we opened the boxes, and pulled the packing slips out (one box was missing a packing slip, so we just used process of elimination). There is no rhyme or reason for how this all is packed, other than it fits perfectly, into 3 boxes, like a puzzle. The steps have you put together big items first (monkey bars, swing set assembly, rock wall, rear ladder, crow's nest base and slide). Then, it goes on to step by step for how to build the clubhouse. After the main structure is together, you attach all the things. We took the first page(s) and found all of the items needed to construct the first big item. We laid them all into a pile, found all of the nuts/bolts/locks/etc and put them into individual baggies (clearly labeled). We piled them all together, and put the corresponding papers on top of it. Then to the next large piece's parts and pages... and the next, and the next. Soon, all of the main items were placed into piles, with every piece of wood and hardware, with the pages that told you how to construct them, laying on top. Next, we got to the instructions for each step of the main structure/clubhouse. Since you can't really "group" them together, we literally went page by page. Each page has what wood pieces and hardware are needed, listed on the top. Some piles had 1 piece of wood, and a bolt or two... some piles had MULTIPLE. (Oh... each baggie, with hardware, I would write something like "monkey bars - bolt # and what size/quantity"... just look at the photos for all of these examples, cause I don't want to explain it wrong). But, we just went page by page. Laying it all out, in order. This took us 2 nights... just the two of us (and a few adult beverages). Here was my thought process... I had myself, my husband, and 2 other couples, willing to come over and help FOR ONE SATURDAY. What I didn't want? One single book, being passed around, people looking for things, using wrong pieces, losing things, etc. If I had them for a day, I needed to make the MOST of it. It totally worked! It was the most methodical madness...ever. All the comments from friends were "I'm so glad you had this all so organized!" They all came over Saturday morning. They brought their drills and bits (and coffee). We got started right away (about 11AM). Each couple grabbed one of the larger item piles, and put together whatever it was (my one piece of advice? Pay attention to the slide... bolting the wood to the bottom? You need to leave a little slide at the end. The piece of wood doesn't sit flush with the end of the slide. I missed this. Thankfully, a friend had a good idea with how to fix it, without making more holes in the slide... thank you, friend!). After all of the items were constructed, we set them in the front yard. It was now on to constructing the clubhouse. This part was harder to work with all 6 hands. But, some were working, and others were grabbing items/tools/instructions/etc. We decided to build most of the clubhouse on the driveway, for a level surface, and easy access to all of the steps, that were still laid out in the garage. Once we got to a point that we felt we should move it, we brought it down (again, refer to photos). From there, we had people bringing each step down, and crews alternating working on the rest of the steps (it was pretty hot that day, so the switching off was nice). But, it was great to have some extra company and encouragement. ;) Toward the end, we had all the crews connecting the big items, simultaneously, and the lone man up in the crow's nest (that thing is seriously the most time consuming part of it all). While they were finishing all the last details, I ran to Home Depot, and picked up 15 50lb bags of play sand. I think we wound up only using 12-13 bags, for all of you wondering. By 7PM, every last item was done, the sandbox was filled, and the kids were having a blast. Later, we got some 5" edging, and edged out an irregular shape, around the play set. It took about 6 yards of play bark to fill it with a few inches (makes my mama heart feel better, in case anyone falls off). All in all, I'm estimating it took about as long to lay out the parts as it did to put it together. However... it was completely worth it. I would NOT do it any other way. Nothing was lost, broken, installed wrong (except ALMOST the bottom board of the slide). A few pieces were a little warped.. but none were broken. This is WOOD. Not every piece will be perfect. Do I regret this purchase? Absolutely not! My kids are like "can we go out and play on our park, before dinner?" They love it. They are 3.5 and 2, and play just great on it. It is PLENTY tall. Adults can fit... even up in the crow's nest. Can I stand up, completely (I'm 5'11")? No. But we have older children come play on it, and no child has been "too big" for it, yet. I think the oldest child we had was like 10.5? Perhaps older. The slide is long... even I get going a little bit on it. Before I added the wood chips, I could dangle from the monkey bars (there are 4 bars), without touching the ground. With wood chips, I just barely have to pick up my feet. The girls are too small to do the monkey bars alone. I've seen some people block off the entrance to it, on the club house, and leave them off altogether, but my kids don't attempt without us, so we opted to leave it on, for their older friends/cousins. They learned to do the rock wall quickly, and love it. They eat on the picnic table a lot. Downfall? Their friends can NOT keep the sand in the sandbox. I'm debating constructing something that keeps it closed, so those friends can't get into it... I HATE cleaning up the sand from the lower deck. The seesaw swing is awesome, since the girls aren't big enough to "pump" on a normal swing really well, yet. They get going on that double swing like crazy, so I don't always have to be out to push them on the other 2. The telescope is fun. It isn't magnified, or anything, but nobody has complained. I can see us getting MANY years of good use out of this. I'm so happy I didn't get a smaller set. Truly... for the price, you get SO many options for them to play on, and kids of all sizes can fit. It is very very sturdy, and looks beautiful in the yard. I am happy to answer questions!
G**A
Decent parts, nice playset, good delivery but you need to be experienced to do it yourself.
Just got done putting this together and have climbed all over it, so let me leave a review while its still fresh. First, the delivery was scheduled and they actually called ahead to deliver it more than a week early, which was nice. The truck driver was helpful and helped me put it in a spot in the garage. There are four 8' x 1' x 2' boxes that are four different weights. The one with all the metal pieces in it is the only one that's really an issue moving around. So delivery was definitely 5 stars. Make sure you have all the tools you will need before you start. I did, but only by luck. You will need a good ladder, drill bit set (this calls for about 3 different bit sizes), hammer, good drill preferably with two batteries, socket wrench for the bolts, T square, level. I'm not sure if those are listed anywhere, but you do need a fairly good number of tools to put this together right. After reading a few reviews and hints, I unloaded the four boxes using half of my 2 car garage. All the wood pieces are lettered, with about 15 different letters. Some have 4 pieces for a letter, some have 50. There are a lot of Ms. So after putting them in a general order by letter/number, I started working. What I would have done to save time, as I did this all myself, would be to go through each step and just lay out your pieces and fasteners for every step and then start the steps. With two people it would be easy to have one person working ahead to gather the pieces and have the other assembling each step. The first half the project I spent A LOT of time hunting for each piece and each fastener for each step. The instructions have you start of putting together some of the larger side pieces; monkey bars, slide, swing bar, ladder, rock wall, small roof, bay windows. I didn't but you may think about putting the bay windows together as you're putting them in. They were a bit of an issue to make them fit right once they're already together. Make sure you can get these pieces wherever they need to go before you put them together. I was working in the garage so taking out the monkey bars or the swing bar would have been a bit of an issue. Once those pieces are together, you will want to make sure you are putting this together where its going to go. You start to put the frame together and it gets large and heavy fast (that's what she said). PAY CLOSE ATTENTION TO THE PILOT HOLES, SPACING OF HOLES, ETC. I spent a lot of time having to turn things around later or undoing things because the instructions were not explicit when a hole was an inch more to the right or left, or that a piece was mounted slightly differently. Sometimes the instructions call it out, sometimes it doesn't. It got really frustrating. The assembly wasn't really that difficult really, I would give it probably 4 stars. The instructions are pretty good most of the time and I only had a couple places (putting on the smaller roof and mounting the crow's nest) that would have been far easier and safer with two people. I did put most of the crow's nest together before putting it up, but that would be much easier with two people (almost died). That being said, assembly took 14 hours. I probably lost a couple hours having to undo/redo some things and then hunting for fasteners that my kid decided to throw around the lawn. So keep that in mind. I have seen videos of people taking 10 hours and others taking 30, 40, 50 hours, which makes no sense. There are plenty of extra fasteners so if you break/lose one of something, you'll be okay. That may happen. I had a screw head that was all warped and another bolt head that popped off. The wood can split a little if you're not safe and there's nothing you can really do about that, but I am a 275 pound man and I was all over this thing (besides the crow's nest) and it was plenty secure. That was without it being fully completed and secured to the ground. So that's about it. I will include some pictures of how everything went together. I only give this 4 because of some of the annoyances with the instructions and the few small defects involved. It would really be like a 4.5.
C**E
Module de très grande qualité et en cèdre ( ne pourrie pas ) . Tout les pièces sont identifiés et le manuel ou même l'appli pour l'assemblée fonctionne a merveille . Les enfants l'adorent
J**B
Takes awhile to put together but great investment kids enjoy spending all day on it
Trustpilot
Hace 1 semana
Hace 3 semanas