🍹 Sip, Savor, and Celebrate with Style!
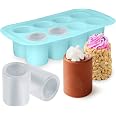
The Wilton Cookie Shot Glass Pan is a 6-cavity non-stick steel baking pan designed for creating unique cookie shot glasses and chocolate cups. Oven and dishwasher safe, it’s perfect for various occasions, ensuring easy release and cleanup for delightful treats that impress.


| Is Oven Safe | Yes |
| Occasion | Christmas, Wedding, Birthday, Thanksgiving, Valentine's Day |
| Shape | Round |
| Color | Non Stick |
| Specific Uses For Product | Dishwasher safe |
| Special Feature | Dishwasher safe |
| Is the item dishwasher safe? | Yes |
| Material Type | Steel |
| Product Care Instructions | Dishwasher Safe |
| Item Weight | 0.5 Kilograms |
| Item Dimensions D x W x H | 2.35"D x 9.45"W x 6.08"H |
| Capacity | 6 Cups |
P**R
Great asset to for your baking toolset
Worked like a charm! Great asset for any baker.
J**M
Fun little cookie shot glasses!
I used the included cookie recipe (minus the mini chocolate chips) based on what I read in the reviews, and my first time using this turned out great! I sprayed the pan and the inserts with vegetable oil before placing the cookie dough in, and once cooled after baking, the cookies were easy to slip right out of the pan and off the inserts.I filled the little cookie shot glasses with ice cream, and they were an absolute hit with my family!
R**L
Takes a couple tries to master
This takes some time to master...First attempt was a bit of a disaster and yes, the oven did catch on fire (whoopsies)....Tip #1: Use the recipe provided! (The extra flour in this one helps a lot!)Tip #2: While I do not think that you need cooking spray, I find it suuuuuper helpful to use a strip of waxed paper inserted before putting the cookie dough in the mold. It makes it so much easier to pull out the cookie shots rather than struggling with a knife and destroying the product in the process! (many a tear was shed over this)Tip #3: DO NOT fill the mold to the top with cookie dough like the picture, unless you like excess cookie dough all over the pan and at the bottom of your oven catching on fire! Fill it only 2/3 of the way up (the dough WILL rise).Tip #4: Press the plunger evenly straight down.....still working on how far to plunge it. Sometimes I will plunge it, then gently twist it and check how it looks before putting the plunger back in and sticking them pan in the oven.Tip #5: Put something heavy in the plunger space (I filled it with dry uncooked rice and it seemed to work)! If Wilton remakes these, they should make the plungers solid because my goodness expanding cookie dough is a force to be reckoned with! I think putting less cookie dough in the mold overall helped, but those plungers are NO MATCH for expanding cookie dough and are pushed out and away.Tip #6: Let it cool for a good couple of minutes before baking, otherwise the shots may collapse.Those are all the tips I have for now! Hope they help! :)
D**S
Just call me big back LoL
The media could not be loaded. I love it and the possibilities are endless. I love entertaining and this is a great addition. The Wilton recipe is good and makes about 15-16 shot cookies. We kept filling them and eating them so I only have a few to show. Cleaning is easy. Nicely weighted, sturdy and it’s a steal for the price. I usually pay about $10 for cookie shots but now it’s costing me next to nothing.
C**M
Works well, This is good for cake too!
When I saw this tray, I decided to buy it and try it for cake as well as cookies. I like to make use of all my trays and don't want a single use item tray. It worked very well for my cake recipe idea. The comments on the tray I read here are all correct. If you over fill the tray compartments it gets messy, also, I had to put a sheet pan over the cups to hold them in place once I put them in the oven. The edges are never as nice as in the picture, but I like the way they look. I would recommend a sponge type of cake for this if you are not just using cookie dough since it won't fall apart, I would always fill the cups with a sleeve, not a spoon, so you fill all the way and don't break the cup by having to press down on the filler. For a studier cup line the inside with chocolate (or any other coating) that hardens before filling the cups. And finally, you can't squeeze the metal cups all the way down into the batter if you want a bottom, or you can use some king of hard cookie or graham pressed to the bottom before pouring the batter..I always like to use a fruit jam or chocolate ganache under the cup for a more tasty and sturdy pastry and a more colorful look.I will be using this tray often.
T**S
First attempt was a flop, but I learned a lot so next attempt should look better
Well I can’t say that I had a whole lot of success with this Sweet Shooters cookie pan, but knowing what I know now I think my second attempt will look better.Tip #1: you really need to follow the recipe provided and use mini chocolate chips. I just used regular sized chips and I think the chips kept the plunger/insert part of the pan from centering correctly. Because the plunger was not centered, the sides did not bake to an even thickness. And because sections of the cookie shooters were very thin, some of the cookies broke apart when I tried to twist them out of the pan.Tip #2: Two tablespoons wasn’t enough dough to fill up the cavity. When I pushed the plunger/insert down, the cookie dough did come out the top like it is shown in the picture. I will try 3 tablespoons next time.Tip #3: When you force the plunger/insert into the cookie dough that is filling the cavity make sure the plunger goes STRAIGHT down. If it is a little off center the walls of the finished cookie shooter will not be uniform which will cause problems when you try to remove the finished cookies.Tip #4: Don’t force the plunger all the way to the bottom. I think I forced it down too much which caused the hole to form at the bottom of all my finished cookie.Tip #5: Put something heavy on top the pan to keep the plunger/insert from floating up during baking??? While I was baking the cookies, the plunger floated half way out of the cavity. About 12 minutes into the baking time I had to reach into the hot oven and pushed the plunger back into the cavity. Next time I might put a little baking pan on top of the plungers to keep them in place.Tip #6: The tops of my cookies came out very messy and ragged looking. Don’t know what would help this problem other than more cookie dough.Tip #7: Make sure you grease the pan very, very well. I sprayed the pan with cooking oil, but I still had trouble getting the cookies out. One cookie completely crumbled, and a second cookie shooter lost its bottom when I pulled it out. I will use solid shortening next time.Another issue with the pan is the way the directions/instructions were presented. There are some instructions printed on the back on the box, but the most important instructions about how to prep and use the pan are buried in the chocolate chip cookie recipe that is printed on a small slip of paper. It would be nice to have all the instructions on the back of the box.So these Sweet Shooters are a cute idea, but it is going to take me a few tries to get the technique perfected.
J**E
Love them!
Exactly as described.
E**R
Toppers too light
They work ok if you’re not going to bake what you put in them as the toppers don’t stay down without being weighted
Trustpilot
Hace 3 semanas
Hace 4 días