


📺 Elevate your viewing game with strength and style!
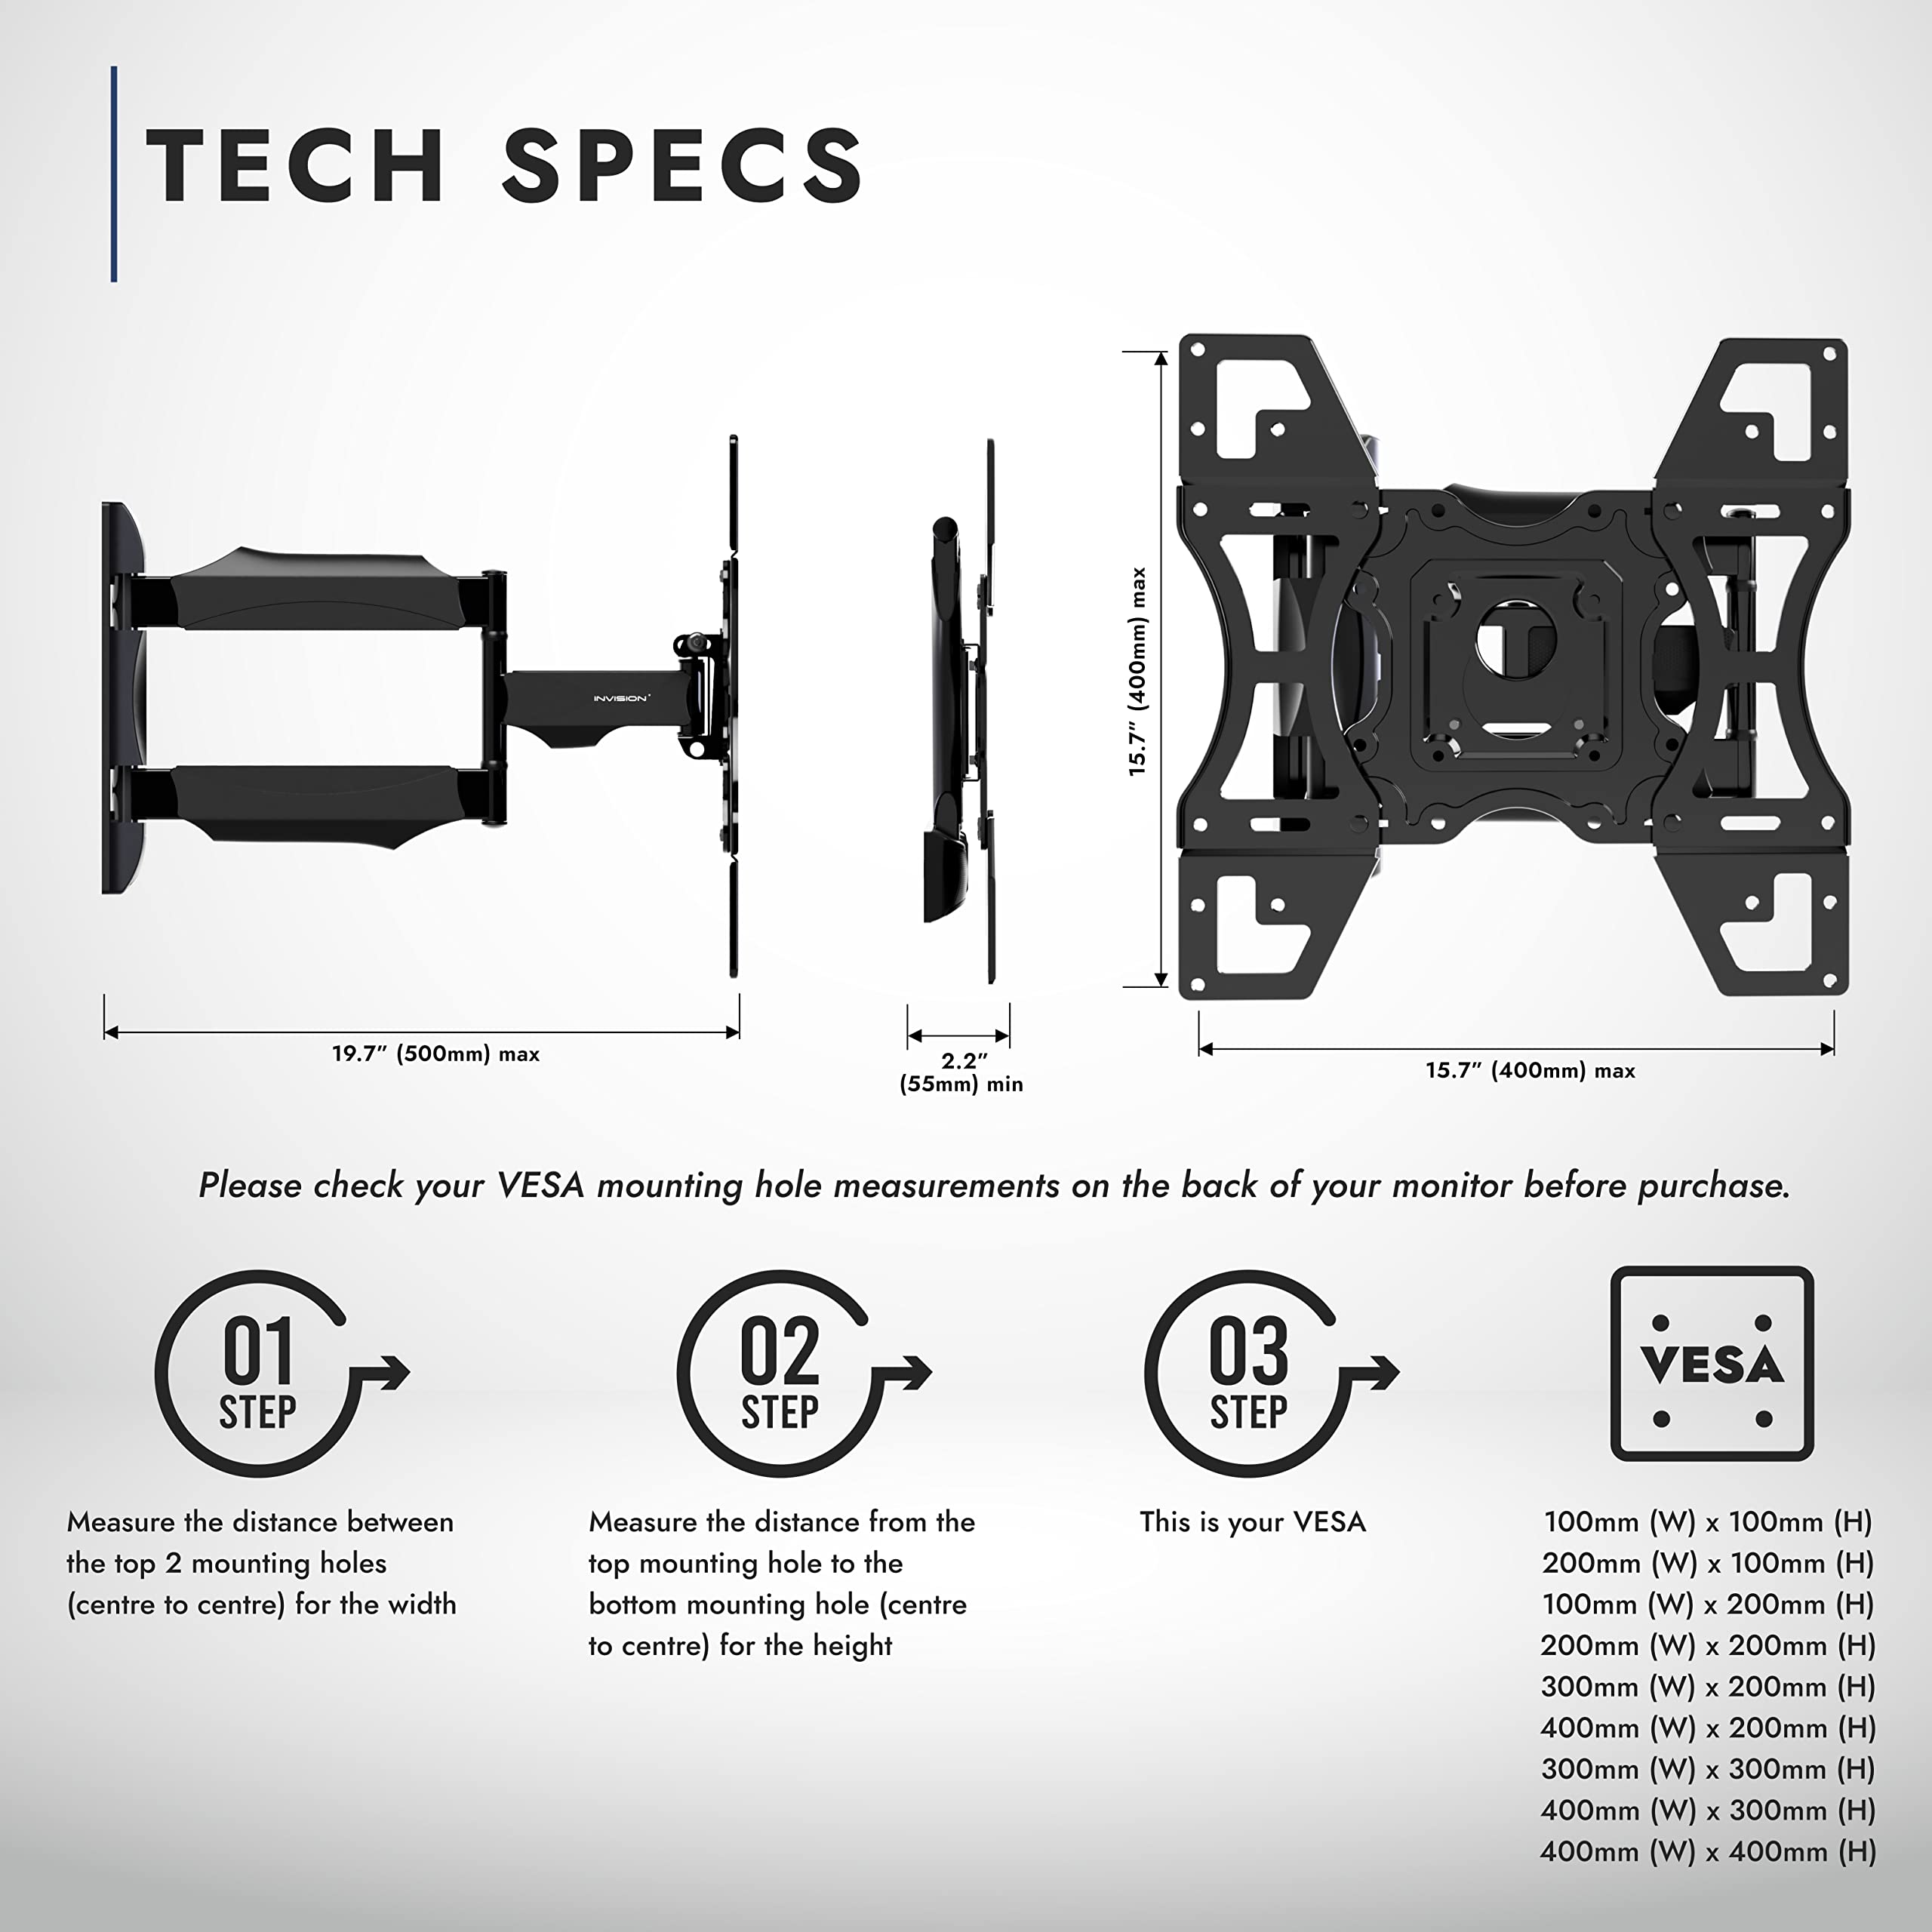
The Invision Ultra Strong TV Wall Bracket (HDTV-L) is a premium single-arm mount designed for 26-60 inch TVs, supporting up to 40kg with a reinforced steel build. It features an ultra-slim 55mm profile, extends up to 500mm, and offers 180° swivel plus tilt adjustment for optimal viewing angles. Compatible with VESA 100x100mm to 400x400mm standards, it includes all necessary hardware and a spirit level for quick, secure installation.


M**.
Solid, well designed bracket at a very good price point. Easily adaptable for non-VESA compliant TVs (e.g. Sonys)
Excellent product. I looked at a lot of different brackets before taking a chance on this one - I was worried about quality due to the massive price difference between this and 'premium' brackets. I needn't have been concerned.The bracket is of extremely sturdy construction with a wide selection of bolts and spacers etc to fit pretty much any tv. The instructions were clear and the bracket was easy to fit - it comes with good sized wall bolts and plugs - more than sufficient to secure a modern, relatively light panel to the wall (a solid brick wall in my case). I bought this to mount my tv in the corner of the room. The bracket keeps the tv straight at all extensions and angles - I'm sad enough to have checked with a spirit level!Very happy with my purchase.A note to Sony TV owners. This bracket isn't compatible as Sony's aren't VESA compliant. However, I was able to easily convert it for use with my 42" Sony by bolting a wooden brace across the top of the large bracket, in the middle of which I then bolted the standard Sony wall mount (which the tv hangs from). I then made and bolted two wooden spacers on bottom of the wall bracket for the bottom of the TV to sit against, a la the way the Sony is designed to be mounted directly onto a wall. This approach was far cheaper (about £6) and I think more sturdy than the overpriced VESA 'conversion kits' you can buy for Sonys.
M**E
Great device, extremely sturdy, some tips for the beginner...
This is a very sturdy mount, I would recommend to anyone. Few words of instruction to buyers:The package contains a whole bunch of screws to accommodate different TV mount screw holes, so you just need to figure out which ones fit into the back of your TV. Once you figured that out, the manual tells you what rubber bit you need. You mount the bracket to the back of the TV, and mount the other part to the wall, making sure to get both parts the right way up. Bear in mind the wall bracket will be offset from the TV centre point, since the two arms are of different length.When drilling the holes into masonry, I strongly recommend triple checking the locations of the holes to ensure a level mount. I put masking tape on the wall then drew pen marks on, as it stops the drill bit slipping. Turn off the hammer for the first few turns to get a hole at the right point, and I recommend using pilot holes: The hole width you need is 10mm (8cm deep), so I used a 4mm bit then an 8mm then finally widening to 10mm to get a nice clean hole. The rawl plugs sit in very tightly and need quite a whack to get them flush with the wall. The bolts screw in EXTREMELY tight into these holes and require a "ratchet socket set" (maybe £15 for a decent one) to get enough torque--my power drill started smoking and it took me a LONG time with an adjustable spanner before I decided to get some better tools. You can also use the ratchet to easily adjust the TV once mounted.It is relatively easy to mount the TV, it just hooks on at the top then you tighten two nuts at the bottom to fix it.Once mounted, you can adjust the downwards tilt and also the left/right rotation in case you happened to mount the bracket a little off vertical.The thing is absolutely rock solid on the wall, as you would expect after putting 4x8cm long bots into a brick wall. Very good for the price.
M**H
Best buy on Amazon - Slim and very strong.
One of my best buys on Amazon. I have a 55" Samsung Smart TV and wanted to mount it on a breeze block wall. My requirements were that the bracket would allow the TV to be pulled out (it definitely helps when feeding through cables) and at the same time one which could twist in both directions.I was quite skeptical due to the low price and the fact that there's only one arm attached to the wall. Other brackets I've seen which do the same job were between £100 - £180 and had two arms on the wall. The number of reviews convinced me to give it a shot (you don't get two chances when you're drilling into your wall!).I couldn't be more pleased. The final product is outstanding, my neighbor has even purchased one. At first you might think that this isn't going to take the weight of the TV - but it will (there's a maximum weight mentioned on the instructions paper, but my TV weighed in at half the maximum allowed weight).Before you purchase, check your TV's specified VESA. This is the gap between the TV bracket holes at the back your TV. Measure them in mm horizontally (top left to top right) and vertically (top right to bottom right). The maximum this bracket can be used for is VESA 400.All the required screws and nuts are provided, although, you'll need to check which ones work for your TV. You'll need some good spanners/pliers when you come to the small nuts.A few things to note:1. The face of the bracket (where the TV hangs) will be in the middle of the wall (or wherever you want the middle of the TV), but the plate which you screw into the wall will be to the left or right of the TV (depending on how you install the bracket).2. Make sure you take the required measurements before you drill.3. You'll need two people to do this if you're going to do it properly.4. Don't drill all 4 holes at the same time (yes there's only 4 holes required despite the fact that there are more holes on the plate).5. You need to use a spirit level especially after you're first hole to measure up your second.6. You can slightly adjust the TV (if one side is lower), but only slightly using the nuts which hold the TV to the plate.7. The cable hiding featured plastic will be of little use as you can only fit on thin cable on the top and bottom. You won't get a strong HDMI cable through it.8. Once again, make sure you've got your measurements right, check it multiple times before you drill. If going into a masonry wall, you'll need a size 10 drill bit and you'll go in 18cm into the wall (the measurements are mentioned on the instructions paper which doesn't help too much to be honest).9. If you're not sure what you're doing, I'd call in a professional.Overall, perfect - I'm very satisfied with the product it's very slim and makes the TV look beautiful when mounted.
Trustpilot
3 days ago
1 week ago
