

📡 Elevate Your Signal Game!
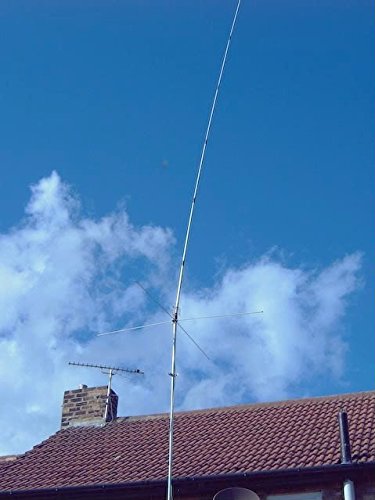
The Sirio Tornado 50-60 MHz Omni-Directional Antenna is a high-performance base station antenna designed for the 6-meter band. With a gain of 1.2 dBd and a maximum power handling of 1000 Watts, this antenna ensures reliable communication. Its durable aluminum alloy construction and tunable whip length make it a versatile choice for both amateur and professional use, while its impressive wind resistance guarantees performance in challenging conditions.
| Maximum Range | 6 Meters |
| Color | Silver |
M**M
Good general use 6m antenna
Like the 6m beam from Sirio, this is a solid antenna and it works well. It's my off-season 6m antenna for unexpected Es openings and for 6m FM work. As with the Yagi, the instructions are a bit sparse but I managed w/o much trouble.The hardest part I had was with the mounting bracket not being attached to the main section. It's tricky to mount it at the same time as when holding it (team mounting recommended)! I solved the problem by slipping the base into another pipe and bypassing the mounting clamps altogether, then I put a screw through it so it wouldn't turn in the wind somehow (never underestimate the wind).
S**E
Good value for a 6 meter antenna
The assembly was simple and took two people about twenty minutes or less to assemble starting from cutting open the shipping box. The antenna is well constructed and the frequency to length table provided in the instructions matched my analyzer results once on the mast. The assembly hardware package was short one self-tapping screw but I do a lot of work with antennas including construction of home brew antennas so fasteners and clamps are not a problem for me. Just inspect your hardware assembly and mounting package before you begin installation so you can have everything on-hand before you start work.I own numerous Sirio base antennas and I'm satisfied with all of them. They are an excellent value for the money.
T**E
I like the antenna
Please bear with me, as this review is going to be LONG....and DETAILED. I'm an "attention to detail" kind of guy....and...I'm an Electrical Engineer...with over 30 years experience in the Comm world....and a ham of 30 years. This is NOT.....my "first rodeo". I have worked with antenna and transmission lines....both as a hobby....and as a professional....for MANY years. I like the antenna....and agree it's of good quality and has a wide bandwidth with low SWR. BUT WHAT I HAD ISSUES WITH....and will describe in detail here....was the INSTALLATION and BUILDING of the antenna! That took several hours. I'd sure love to have feedback on what I'm detailing here....and how on earth the one review said he "put it together in 15 minutes". No way...........................So the moment I opened the box.....the first thing an Engineer does is look for the instructions (followed shortly thereafter by an inventory of parts). That's when i realized my FIRST problem. No instructions in English. There was one side of a page that had a thorough explanation of grounding requirements, suggested mounting options and other general safety info....THAT....was in English. But on the other side, there were numbered instructions of some kind.....that were in every language BUT English. There was French, Russian, German, Italian (of course, the antenna is made there), Spanish.....etc, etc. BUT NO ENGLISH. There was another sheet that had was ALL in English, that had a parts list, tuning charts, specifications, etc. But that sheet did NOT specifically tell you how to put the antenna together.So I called the distributor (DNJ Radio). They assured me the instructions WERE in English. Nope, I explained/detailed what I had as discussed in my writing above. He kept insisting that parts list was the instructions. I went back and forth a few times....asked some questions....and without the antenna sitting in front of me....didn't feel like debating anymore with him. How hard could it be I thought. Looked fairly straightforward at first glance.So I proceeded to attempt installation. Again, I'm big into attention to detail....as well as an Engineer. So when I tried to figure out how the pieces of the main "telescopic aluminum whip" went together (that's what the illustrated parts list calls it), that's where the issue is. It says in the illustrated parts list on the Tornado 50-60, there should be 3 sections of this radiator (that's what I'll call it from this point on)...and there is a bottom section that the largest of the 3 sections will fit onto. That part, was easy. They give you the 3 sections, and the base section, and on THIS antenna.....4 phillips tapping screws and one hose clamp.For the base to the biggest of the 3 sections, there could be no doubt how to assemble it. there were 2 holes on the outside top of the base section on the top....and 2 holes on the bottom of the largest of the 3 sections....so of course, just slide together and use TWO of the tapping screws (so now, there are only 2 screws left...and a hose clamp) and line up the holes and that joint is done. Now i have 2 sections left to mount. The next size section (we'll call it section 2), had slits cut in the bottom of the section....as if they wanted you to compress that section. So I reasoned that the hose clamp perhaps fit on the outside top of the 3rd section (which is already mounted)...with this 2nd section slipped in with the slits lined up with the top of the 3rd section....then tighten down on the hose clamp perhaps? Tried that, no luck. No matter how much I tightened down the small hose clamp....over the joint of the two sections....that did nothing to compress the two sections enough to make it firm. The 2nd, inside section would slide up and down....no matter how much I tightened the hose clamp. AND....ALSO....I noted there WERE INDEED TWO HOLES....on the outside TOP of the already mounted 3rd section at the largest end of it....so I thought surely screws must go in here also? BUT....there were no corresponding holes on the bottom of the 2nd section, just the cut slits. What on earth?So I looked at the TOP section....and found it had NO holes on the bottom of it, but the 2nd section (still not mounted at this point)....DID indeed have holes on the TOP of it.SO IN OTHER WORDS, TO ME....IT WAS AS IF THEY INTENDED FOR ALL SECTIONS TO BE MOUNTED WITH SCREWS....BUT THEY ONLY SUPPLIED 4 SCREWS ...NOT THE NEEDED 6....AND THEY PROVIDED A HOSE CLAMP, BUT I HAVE NO IDEA WHAT ITS INTENTION IS. Had there been instructions, PERHPAS all of this would have been made clear? But again, why the holes on ALL joints....if you don't intend on putting screws in them? And why the hose clamp....if it doesn't work anywhere? The parts list (which is your "only instructions") seems to indicate the hose clamp should go over one of the top joints of the last sections, but I tried that and that didn't work. The 2nd section, with the slits which would make you think possibly it should be mounted in compression....has the slits at the bottom (and all the pieces are tapered....getting smaller as you go up....so there really is only one "direction" to mount them....ie....it's would appear clear that the larger end goes down and into the piece below it, the smaller end at the top of that section is where the next smaller section will slide in to mount, etc.).So in conclusion, I deduced....having NO formal instructions....the following. They intended ALL sections to be screwed together. They left out 2 screws, I had to add those. They didn't drill 2 sections, I had to DRILL those holes. The hose clamp, the only use i could find....was for tuning....as described below.So i lined up the 2nd section with the third....made it the necessary length to obtain resonance where I wanted (more on that below)...and DRILLED TWO HOLES INTO THE 2nd section....where the two holes were already in the top of the third section. I then used the final 2 provided screws to mount that joint.Now all that was left was the top section. No screws left....but yet there were two holes provided in the top of section 2. Hose clamp doesn't work (for a permanent mount)....so I set the last section the length I needed for resonance (in my case, I chose 3682 mm on the tuning chart (more on that later)...which comes to about 145 inches or 12 foot one inch). I put the hose clamp on the OUTSIDE OF THAT 3rd section....NOT OVER A JOIINT....but just where it would allow me to try the antenna at this height. The hose clamp at this point did nothing but keep the 3rd and final section from slipping DOWN any further. The section could still easily be lifted up. So it was NOT secure. I just did this to allow a test at this length for resonance. I mounted the antenna on a 5 foot piece of mast, then mounted the whole assembly using C-clamps on a ladder. That put the antenna about 10 feet above ground. Hooked up a short run of coax and tested for SWR. Perfect....very wide low SWR bandwidth...even that low off the ground (I'm pleased with that part...and the construction/quality of the antenna).So now I took the antenna off the ladder....and...DRILLED TWO MORE HOLES...into the bottom of the top section....where it lined up with the existing provided holes at the top of the already mounted 2nd section. I then provided TWO MORE SCREWS from my hardware collection, and finished assembling the antenna.That took a bit over 2 hours....and I had to provide 2 screws....and drill 4 holes in total. Oh, I was surprised how hard it was to drill those 4 holes. Not a big deal, but not like drilling thru aluminum. Much tougher.SO AGAIN, I'd love to know how you were SUPPOSED to mount those pieces I just described? If not using screws, why were those predrilled holes provided in ALL pieces? Or....did they send me the WRONG sections? AGAIN, IF THERE WERE STEP BY STEP INSTRUCTIONS, this would have no doubt been clearer? (I still can't help but think there was something missing with my antenna....not just the instructions...but missing screws or wrong sections missing holes drilled in them?). PLEASE, ANYONE WHO HAS ONE...SOUND OFF ABOUT THIS!!!!!!!!!!!As for tuning....that wasn't CRYSTAL clear either. The provided tuning chart is small...and...the numbers on the vertical side of the chart don't EXACTLY line up with any particular line on the graph....though...there are 11 numbers and 11 main lines...so I wasn't sure whether the numbers indicated the major line....or where the bold line intersected with the frequency you wanted (listed on the bottom). I wound up choosing 3682 mm and reasoned that length would get me in the ballpark, and actual testing could narrow it down if more tuning was needed. I was VERY pleased that the antenna is very broad, so as it turns out....that setting gave me a VERY broad low SWR bandwidth. In fact, I stopped testing when I got to 53 Mhz. From 50.000 to 53.000, The SWR is QUITE low!I'm pleased with the antenna, just NOT pleased with the lack of instructions and confusing assembly....for something that SHOULD have been very straightforward. AGAIN, PLEASE...those who have this antenna and have assembled it...PLEASE TELL ME HOW YOU DID IT!I gave it 4 stars. Could have been 5, but not with the lack of instructions and what I just described. How does is perform? Well, I have a discone antenna up on my tower at 40 feet. It is very broad bandwidth, but with very LITTLE gain. I am comparing this antenna....mounted at only 20 foot on a mast on a mount on the eve of one side of the house. As one would suspect, the discone at 40 feet hears better. I have yet to work a contact on the new antenna. But I suspect comparing it at 20 feet....to the discone at 40 feet, is NOT a fair comparison. Height does matter. I think it will do ok at 20 foot.
R**1
Covers all of 6 meters
This antenna covers all of 6 meters with a 2.5:1 swr at each end. I have it setup for SSB (.125) with 1.15:1 swr. This antenna is very compromised at my location. I can only place it 6ft off the ground and still hide from the HOA. Easy to put together (less than 30 min by myself)It seems to do better than the Ringo 6 it replaced. Both in receive and transmit.The only issue I had was the radials fell out after a large wind as others have mentioned. I drilled a small hole for the Allen screw to embed. No more issues.I would buy again.
J**S
Great antenna
It was easy to assemble. Need better instructions on adjusting the swr
M**L
Very strong
Well made and packed very well.
O**J
Great antenna.
Quality built antenna. To my surprise my FTDX10 will tune 6,10,12,15,20 meters on this antenna. Only had for less than 24 hours and have logged stations on all of the these bands. It's not as good on other bands as wire antenna I have up on 10.12.15.20 but works. I run my station remote so now I can work 6-20 with out switching bands.
D**S
Very Well Built Vertical For 6 Meters
This is one heavy duty 6m antenna! I don't think they could make it any easier to assemble and tune. The first two sections are put together with 2 screws each and the holes were aligned perfectly. The last section that is used for tuning is held in place with a small hose clamp. Using the chart that is in the box gives you a good starting point. Here in the USA our 6m is 50 to 54MHz. I tuned it for a flat 1 to 1 on 52MHz and this antenna covered the entire band with my highest SWR at 1.4 to one which is very acceptable.All the mounting hardware is included and fit on my 1.4 inch pole just fine. I am able to hit the only two repeaters in my area which are 23 and 39 miles away with no issues. Just waiting for 6m to open up and expect this antenna will last a lifetime. It will have zero problems handling my max power of 800w.
Trustpilot
1 month ago
1 day ago