🚗🔥 Start smart, arrive comfortable—every time!
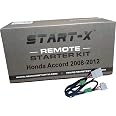
The Start-X Remote Start Kit is a plug-and-play solution designed exclusively for 2008-2012 Honda Accord models with key blade start engines. It features a unique T-harness for easy installation without wire cutting, enabling you to remotely start your vehicle to warm or cool the interior before driving. Compatible with gas and automatic transmissions, this USA-made kit enhances your daily comfort and convenience.


| Manufacturer | Start-X |
| Brand | Start-X |
| Item Weight | 1.23 pounds |
| Package Dimensions | 8.82 x 4.61 x 3.62 inches |
| Country of Origin | USA |
| Item model number | Accord_8-12_Key |
| Manufacturer Part Number | Accord_8-12_Key |
D**E
Easy to install & Works fabulously
The product's installation video and printed instructions made installing this remote started on my 2009 Honda Accord a breeze.The hardest part of the project was getting the cowling on the steering wheels together again. NOT an issue due to the Start-X module, just an issue with the Honda's plastic cowling. (Actually something that was an issue BEFORE I ever bought the remote starter kit.) I solved the problem with a couple of drops of super glue.I HIGHLY RECOMMEND this remote starter kit. Unlike other kits, this one used Honda's OEM key fob to start and stop the engine remotely. No extra fob needed.I installed this in August, but as we began December, the temperature dropped to below freezing and the winds have been gusting to 30 - 40 mph. Nothing better than to enter a car that's warm and toasty at this time of the year.
J**T
Great product
Plug and play, super easy!
P**.
Remote Start
Works great with the factory keys. Easy installation.
L**G
So easy!
Instructions were clear and it works great! Like everyone said, the hard part is putting the bottom cover of the steering column back in.
A**E
Install = easy, Closing up = HARD
Everything functions well. The problem I have is that as every review says, putting it all back together sucks big time. I take a star off because this company made this kit for these vehicles, and even made a video on how to install, but doesn’t show much of anything about putting it back together…and none of the reviews offer any hints either, so I’m gonna try and change that!Closing up tips:1. Make sure you check out the video via the QR code on the cover of the manual, I didn’t see it until I was almost done. Taking down the big trim piece beneath the steering wheel is NOT in the paper instructions but is in the video, and helps a ton.2. The problem with closing up is that the main ignition plug is massive and has like 1” of slack in its cord, so you’re effectively putting a big chunk of plastic into a space that wasn’t designed for a big chunk of plastic.3. They don’t say anything about where to secure the unit, they (and my fellow reviewers) just say “Do it!”, so I’ll try and actually be helpful :). If you are sitting in the drivers seat, and the big trim piece from Tip #1 is removed, there’s a nice open area to the left. It is to the top right of the fuse box, behind the plastic trim. I modified the styrofoam webbing the box came with to fit it onto the box with the wires plugged in, then I zip tied it around its whole body to the aluminum piece in the space I mentioned. The foam will stop it from rattling :)4. Closing up: the video says to run the wires beneath the steering wheel lever, but that some vehicles work better if it goes above the lever- YOU MADE THE VIDEO AND THE KIT FOR A SPECIFIC FAMILY OF VEHICLES, JUST GIVE US THE ANSWER! …anyways in my 2011 accord, I HAD to go under or else the lever can’t close correctly.5. Putting the lower column piece in is a lot easier with the bottom big trim piece still removed. Once you get the lower column piece over the lever, your goal is to align the furthest back (away from the driver) screw, because once you have this one in, it’ll hold said giant plastic plug out of the way. I used a bit of electrical tape to tape my screw to my screwdriver so I could use one hand and a flash light to push the trim piece until it lined up with the hole (use another hand to push the wires out of the way through the lever hole if needed). Once you have it lined up with the hole, hold that thing in place with your left hand, and screw it in with your right. Do the same steps with the other screws, which still take effort but not as much as the first. Once all 3 screws are in, the top of the column should snap right down, and then you can put the large trim piece back in. For the large trim piece, you’ll have to push/lift it up for the clips to line up with the holes, then just push it forward and you’ll hear it click into place. Give it a couple love taps with your palm across the top and bottom to ensure they’re all snapped in.I really hope this helps, because it wouldn’t be so dang hard if anyone would just share some tips instead of just complaining (though the fault is ultimately on the manufacturer for poor instructions).
Z**D
Don’t get in a hurry
This is a GREAT kit! Don’t get in a hurry with the plastic plugs. The main switch harness connect release is so simple it is tricky to figure out. In the end the installation was smooth, and programming was just as described in the instruction sheet included. I would suggest starting with the reset procedure of the module. LOVE THIS KIT!
B**L
Anybody can do this!!!!! Works great…
I bought this remote start kit for my wife’s car for Valentine’s Day because:A). The priceB). The reviewsC). Plug and play installation,and I was not disappointed on any point!! This was a simple installation on our 2010 Honda Accord LX-P. The directions were simple and very precise. Installation was a breeze IF you read the instructions provided and have some amount of mechanical ability. I’m no certified mechanic by any means but I do my own automotive maintenance on all my vehicles because I enjoy doing things on my own. Plus it’s a lot less expensive if you can do it yourself. Programming the module was a breeze if you just read the instructions and do them step by step. Worked the first time with no issues. The only drawback, which has absolutely nothing to do with Start-X, is that you need to make sure that you turn on the defroster and fan with heat BEFORE you shut the car off in the evenings so that you will have defrosted windows the next morning. But I see that as very minimal and well worth the extra “effort”……. Thanks Start-X for a great product that does what it says it does!
A**R
quick no splice install. works as advertised.
30 min install. works great
Trustpilot
2 days ago
4 days ago