Desert Online General Trading LLC
Dubai, United Arab Emirates
Desert Online General Trading LLC
Dubai, United Arab Emirates


💡 Light up your life with power, precision, and style!
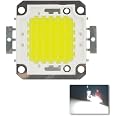
The LOHAS® 50W LED Chip Cool White Bulb delivers a powerful 9000-lumen output at a crisp 6500K color temperature, featuring instant-on technology and a wide 140° beam angle. Designed with energy efficiency and longevity in mind, this modern LED bulb fits standard E26 bases and offers a decade of reliable, bright illumination.


| Brand | L LOHAS LED |
| Light Type | LED |
| Special Feature | Instant On |
| Wattage | 50 watts |
| Bulb Base | E26 |
| Incandescent Equivalent Wattage | 50 Watts |
| Specific Uses For Product | Lamp |
| Light Color | cool white |
| Voltage | 120 Volts |
| Unit Count | 1.0 Count |
| Color Temperature | 6500 Kelvin |
| Number of Items | 1 |
| Brightness | 8000 Lumen |
| Shape | Bulb |
| Material | Aluminum |
| Controller Type | Push Button |
| Included Components | Bulb included |
| Power Source | Corded Electric |
| Color Rendering Index | 6500 |
| Power Consumption | 50 Watts |
| Item Package Quantity | 1 |
| Light Source Type | LED |
| Item Weight | 0.01 Ounces |
| Light Source Wattage | 50 Watts |
| Product Dimensions | 1.57"W x 2.17"H |
| Control Method | App |
| Average Life | 10 Years |
| White Brightness | 9000 Lumens |
| Manufacturer | L LOHAS LED |
| Connectivity Technology | Normal bulb |
| Part Number | B00D1GT772 |
| Item Weight | 0.01 ounces |
| Item model number | LH-XP-50W-6000k |
| Size | 1 Count (Pack of 1) |
| Color | Cool White |
| Style | Modern |
| Special Features | Instant On |
| Batteries Included? | No |
| Batteries Required? | No |
J**Y
Simple and affordable DIY LED lighting
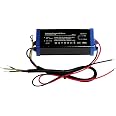
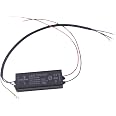
I like this LED module. It produces very bright, white light. So bright in fact that you should not look at it directly unless it's shielded.Like another reviewer mentioned, this is not the only item you need but building a cheap, simple and POWERFUL LED module is easy.My current setup is this:2x 50 watt LED with HSF @ 33.0 volts running from a 12v ATX PSU.I have not mounted a lens on these LEDs yet so the light output is at a 140 degree angle. I measured the light output with a probe at a distance of ~4-6 inches but only recorded data for a few voltages. The light intensity quickly drops off at a distance, so if the light intensity is 40,000 lux at 4-6 inches, it will be 10,000 lux at 12 inches and something like 2,000 lux at 24 inches. The distance of 4-6 inches was chosen because I simply had the LED assembly mounted on a box that was around 4-6 inches tall on my work bench.Output @ 31.5 volts: ~46,000 luxOutput @ 32.5 volts: ~60,000 luxOutput @ 33.0 volts: ~70,000 luxThat's unfocused light output, and though I can't vouch for the complete accuracy of this data you can still use it as a rough metric, just not an absolute. Your results may vary.If you're into technology, a ghetto engineer like I am, or have a degree from MIT, you might have most of the stuff necessary to build a great LED assembly on the cheap just laying around the house. In addition to this LED module (I got the 50 watt kind) you'll need the following items which you might just already have:1) A heatsink large enough to dissipate heat this LED module puts out when running. I had a few stock CPU HSF (heatsink and fan) laying around from an i3 and an i7 processors, as well as a VGA heatsink from a fried Nvidia GT640.2) A power source. I had a 31.5v @ 3A adapter from an old printer laying around which worked at first but I wanted to create a more compact assembly so I bought a 150W Boost Converter DC-DC 10-32V to 12-35V Step Up Voltage Charger Module right here on Amazon.3) Thermal paste. I used Arctic Silver.4) Zip ties.5) Continuity meter (possibly optional).6) Soldering iron, solder, flux, etc.The only thing I had to purchase aside from the LED module was the power source mentioned above (even though I didn't really HAVE to but I wanted to make all the wiring look tidy so what's better than not having two ugly power blocks taking up two outlets?).Now, LEDs are polar, so how the heck do you figure out which tab is positive or negative? I googled it and couldn't figure out what the picture descriptions were taking about. A tab.. pointing in one direction is positive.. the other negative. Whaaat? Anyway, I used a continuity meter. I shoved one of the probes into the area next to the + and the other probe on one of the tabs, then I switched until I found which tab was which. Simple.Next I soldered some wires to the tabs. I used 16 ga stranded copper wire. Seems to be enough for the LED. The wire doesn't get warm when the LED operates so I'm happy.To prepare the heatsink, I spread Arctic Silver on it like I would if I was mounting it to the processor. Whether you choose to spread the compound on the heatsink or the LED is up to you. I found it easier to spread it on the heatsink. The LED is slightly larger than the area of the heatsink that normally houses the CPU which gives you room to use zip ties to fasten the LED to it. Place the LED on the heatsink and twist it back and forth a few times to spread the compound under it better. I made sure that the zip ties were tightening the LED evenly to prevent hot spots.Prepare your power module. If you are using a standard ATX PSU to power your converter, you'll need to connect multiple PSUrails together before connecting them to your 12v DC-DC boost converter. If you use just one rail, the wire will get really hot. ATX PSUs use small, cheap aluminum wiring so you MUST use multiple rails simultaneously (unless you want a fire to burn down your house of course. Don't say I didn't warn you). Anywho, connect the wires together and then connect them to your DC-DC boost. Don't connect the LED yet. Use your volt meter to adjust the POT to your desired voltage. (I seem to get the best performance at 33.0 volts, that is, the increase in brightness is larger than the increase in current consumption of the LED. A higher voltage yields a negligible increase in brightness but a larger current draw, and as a result, higher requirement for heat dissipation.)Make sure your power is turned off and unplugged. Connect the LED. Positive wire to positive terminal, negative to negative. Position the LED/HSF assembly AWAY FROM YOUR FACE (and also away from a reflective surface). Make sure the fan from your HSF assembly is also plugged into the PSU, you'll need the fan to help cool down the LED. Now turn it on. Bright, isn't it. Aww yiss.Now monitor your assembly with an IR heat meter, volt meter, ammeter, Lux meter, what-ever-else-meter-you-have for 24-48 hours. Did it catch fire at any time during this period? Did it smolder a little? Did sparks fly, at any time during your observations? Electrical arching? Did anything that was placed UNDER the LED catch fire? Did the heatsink get so hot that you couldn't keep your finger on it for more than a second? No? Good. Now you're ready to mount it somewhere to light up your display case. Or whatever. If you said "yes" to any of the above, you need to rethink your cooling capacity and do something else because your LED is too hot of a tamale to leave unsupervised.Other thoughts:- You can probably passively cool this LED with a heatsink of biblical proportions but I found that a low noise fan does the job with a small heatsink.- I have tested out one of these 50 watt modules on a thinner VGA heatsink (with fan) and it does get warm but not too warm. Last I measured, after several hours of operation the heatsink was 98F.- Fans on stock HSF are LOUD when their RPMs are not regulated by the motherboard. Pro tip: Connect a 100-ohm 3-watt resistor between the positive fan wire and the positive power wire. The RPMs should be reduced considerably, but the air flow should be enough to cool a LED attached to a CPU heatsink (don't do this if you're using a thinner VGA heatsink).Overall, this LED module is a great buy and lots of fun. The whole assembly cost me something like $25 for two 50 watt LEDs and a DC-DC converter, an assembly that puts out up to 10,000 lumens. Not bad, not bad at all.
N**8
Very very bright... don't look directly at it
Amazingly intense amount of bluish white light for a relatively small amount of power. Running the 50 watt version at 15 watts lights up a small room quite well. Even at reduced power, it will blind you if you look directly at it, so please heed the warnings and be careful! Gets 4 stars because on a polarity sensitive device like this, the plus and minus are NOT clearly marked. Of course I guessed wrong on my first try and hooked it up in reverse, but fortunately it wasn't damaged. YMMV, but on the one I have, with the light producing end of the device facing me and the + and - symbols in the plastic on the right, the minus terminal tab is also on the right. All in all, a very impressive piece of technology at very little expense.
J**G
Great LED Chips, easy to install.
These LED Chips are great. I had to replace the chip in my flood light, and for less than $10 I figure "Why the heck not". I was amazed when I got this installed. It is extremely bright, a bit brighter than the original one I believe. Definitely don't turn these on and then look at them, even from a distance, they will hurt your eyes and leave you seeing spots for at least a good 10 minutes. These are pretty straight to the point on the installation, just solder the + and - wires from the driver/regulator and you are good to go. There are 2 solder points for each making 4 total, but only 2 are marked with their polarity. The inner points are the ones marked, so the outer ones leave you guessing. To make sure you are connecting the correct wire if you are using the outer points, you will need to run a continuity check from inner to outer, that is it. To installed this in the flood light housing I put some 3M Double Sided Thermal Tape on the back of the chip, then placed it down and started the screws. Once all 4 screws were started, I squirted some hot glue along the edges and under the outer solder tabs, then tightened the screws all the way down. This way I got a nice strong hold, and the LED is able to dissipate what little heat it makes to hopefully prolong the life. You don't have to use the thermal tape though, you can just use some regular double sided tape, I just happen to have a roll of the thermal laying on my work bench. Once it was mounted, I got to soldering and got the wires connected then put the light all back together. It works great, and the light is a true white with a hint of blue. I will get some pictures taken and upload them later on. I have another one of these chips that I am going to use, along with a LED Chip Lens, to build a light over my work bench. These are great chips for a really good price, I am going to buy some more for some other lighting projects around my house.***Update 8 Nov 2015***To date I have purchased 6 of these chips for different LED projects and all of them have performed outstandingly. Lohas definitely know what they are doing when it comes to manufacturing LEDs whether it is LED Chips or full LED bulbs. I have purchased multiple ones from Lohas and all of them work great.
D**I
Too early to tell for sure, but so far OK...
The 50W LED element is working and the company has sent two nag notes requesting a positive review. Unfortunately, it isn't possible to assess the value of this product simply due it working initially. I'm hoping it will last a long time... The product was packaged well and arrived promptly (Thanks Amazon). Another observation is that the metal base of the 50W LED element is considerably thinner than the aluminum bases of other units I've seen, Hopefully the base material is a plated copper (as implied on the graphics) and it will do a good job of transferring heat when well anchored and used with a good heat transfer compound. Copper is a better conductor than aluminum. I'm using Arctic Silver thermal compound that I normally use for mounting CPUs. The average life is noted as 30,000 hours (~ 3.4 years continuous use).I'm using this in an existing light housing where the element failed after only a few weeks of use (but the element may not have been very well mounted by the manufacturer), and I hope that the power supply module is working properly.
Trustpilot
2 weeks ago
1 week ago