🎨 Elevate your walls, effortlessly stylish and endlessly flexible.
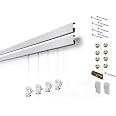
The STAS Cliprail Pro is a premium, heavy-duty picture hanging system spanning 9.84 feet, designed for both residential and commercial spaces. It supports up to 30 lbs per foot and works on virtually any wall type. The kit includes durable aluminum rails, clear cords, zipper hooks rated for 44 lbs each, and all necessary installation hardware, offering a customizable, paintable, and easy-to-install solution for sophisticated art display without nails.


| Unit Count | 1.0 Count |
| Surface Recommendation | Drywall, Wood |
| UPC | 761691267072 |
| Manufacturer | Stas Picture Hanging |
| Part Number | BC10150, BC30150 |
| Item Weight | 2.06 pounds |
| Package Dimensions | 60 x 2.5 x 2.5 inches |
| Item model number | BC101502 |
| Is Discontinued By Manufacturer | No |
| Size | 9.84ft of rail + 4 hooks & cords |
| Item Package Quantity | 1 |
| Usage | Commercial/Residential |
| Batteries Included? | No |
| Batteries Required? | No |
T**B
We love this picture hanging system!
We just moved into a new home and didnt want to damage the wall but wanted a gallery of family photos. The Stas system was easy to install and looks amazing! The high quality materials and ease of use made picture hanging of various size picture frames quick. I ended up purchasing another pack of adjustable hooks for hanging more frames.
B**E
Change out your artwork rapidly!
My wife and I are photographers - and over the years we've accumulated a LOT of framed photos from shows, etc. At home, I'd like to keep a rotating 'gallery' display going, and this is exactly the product to do it with.The heavy monofilament support cord can carry more than one photo vertically, and with a level, a single cord can carry a framed heavy picture. The 'zipper' sliding hooks are easy to adjust up and down.I will be buying MORE - shown in the photo are 3 sections of four purchased. One more set of four will cover a larger wall we have available for gallery space.Base rail installation was not too bad - find studs, place your snap-on screws into firm wood (NOT just drywall!! Get yourself a cheap stud finder...) and be aware of where the section join (longer) snap-on heads need to go (you may miss wood studs with those...). Use a level to insure that your rail will be nice and horizontal. Attaching the rail takes a firm fist blow to "snap!" it on those heads, and trimming to length for the final section is a good job for a vibrating multitool with a blade.I did NOT trim the length of the down-cables - they coil behind the pictures automatically, and in the future I may well have lower hung pictures, or multiples on a single cable.Price seems fair for the quality of the product.
P**S
A little hard to hang, but awesome when it's done
These can be a little tricky to hang just right, but it is worth the effort. Swapping out your art was never this easy.
D**M
Great system. Easy to install. Great customer support.
I couldn't be happier with the system & STAS's customer service!First recommendation is if you are going to mount the rails right up against the ceiling, spend the few extra bucks for either the Clip Rail Max or Multi-Rail Max. The extra back rise will make a better looking installation. That being said I used the basic Cliprail and it worked out very well and looks very good.I ordered about 80' of their standard 2-rail packages. When I received them there was a note that there reviewed my overall order and felt I needed some additional parts to have the installation better. They gave me more connection kits at no charge. They were tight. I needed the additional parts.The installation was amazingly easy. I am not handy and it went like a breeze. The ceilings in my condo are not at all even so i "modified" their standard installation method to compensate for my bad ceilings. Of course being an engineer my idea was brilliant! ;-) The problem with the building construction not the rail system. I'm gong to send them a note and some photos showing my recommendation for the modifications for their installation instructions.
J**N
Versatile
Perfect for hanging pictures without extra holes in the wall. Mounted to framework. Now I can move or change or add pictures.
J**A
Easy gallery wall without holes and paint.
This worked out great for our main hallway that we made into a gallery wall. It was easy to install and I can change the items effortlessly. Pay attention to the weight limit of the vertical cords and the type of hooks you use. The system is sturdy enough to hold multiple pictures, ceramic art and antique mirrors. The included hooks are great for pictures on a wire. It was worth the extra money knowing that I won’t have to spend time filling up holes and painting my walls if I want to change anything on my gallery wall.The negative: The nylon cords tend to stay rolled up unless you place items on the very end.I ended up ordering steel cables (hangs vertical without weight) and the zipper pro hooks from Stas for bulky, heavy items like antique mirrors and my heavy ceramic art pieces.
C**S
Wish I knew about this system 25 yrs ago!!!
This makes picture/art hanging super easy and look like a pro did it.I've been married for 25 years and we have moved every 24 months. If you think dealing with movers is painful how about hanging a home full of art every 2 yrs. If you don't care whether art is hung level or placed in the center of walls, or the tops of picture are level with the tops of door/window casings then read no further. We have a nice home and I notice when things aren't level or are off by 1/8 of an inch, so it would take me a full week hanging art in each new home. Measuring the wall length and the art length and calculating the exact place on the wall to drill your anchors holes or worse finding that the hangers on the back of the art were not installed level. I could nver get that week back in my life, until I saw this system.I saw this system on Amazon and decided to try it out with the 4 rail complete system. It took me 5 minutes to measure the wall and locate my anchor points. I used my 4' level to make sure they were level drilled the holes and installed the anchors and screws, I put the cables on the rail and tapped the end plugs into place on the rails, then snapped the clip rail into place. That was was super easy and then all I needed to do was put the hooks on the cables and level the hooks approximately near where I wanted the art to hang. Then adjust the hooks to my final hanging point.What I love is that I can swap out art without needing to patch holes and repaint walls!!! This was a great invention, and I wish I had discovered it earlier in life I would have saved 4.5 days of time on each move.
B**D
Perfect for a difficult situation!
With 14ft ceilings this was a very difficult project for us. With this system we were able to level and space perfectly. I was able to measure where the zipper hooks should be before we hung and then we could slide to get the spacing. Can’t think of any other was we could have accomplished this without hiring professionals.
Trustpilot
1 day ago
5 days ago