🔌 Hide the mess, flaunt the finesse.
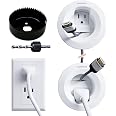
The ECHOGEAR In-Wall Cable Management Kit offers a modern, screw-in installation solution with 3.75” x 3.25” polycarbonate modules, a 6ft extension cord, and a drywall hole saw attachment. ETL In-Wall Certified for power safety, it supports multiple large cables behind the wall, enabling a clean, professional look in just 30 minutes, backed by 7-day tech support and an eco-conscious tree-planting initiative.


| Installation Type | Screw-In |
| Material Type | Plastic" or "Polycarbonate |
| Style | Modern |
Trustpilot
1 month ago
1 week ago