💧 Elevate Your Air Quality – Because Your Home Deserves It!
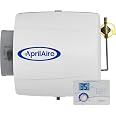
The Aprilaire 500 Whole-House Humidifier is a state-of-the-art solution designed for homes up to 3,600 square feet, offering a robust capacity of 12 gallons per day. With automatic dual sensors and a user-friendly digital control panel, it ensures optimal humidity levels while promoting a healthier living environment by reducing allergens and preserving your home’s integrity.


A**.
Humidifier works great! Installed myself taking my time
Humidifier works great! Installed myself taking my time, I broke the project into 4 phases (days) and about 2 hours planning and picking up what I needed at the store. This is a time consuming project, but if you are comfortable with other home improvements such as adding outlets, lights, switches, fixing pluming, etc...this will be a job you can do yourself.Phase one I spent about 4 hours mounting the humidifier and bypass ductwork. I purchased 6" duct from my local home improvement store. I used a 3/8" drill bit to drill to start an initial hole then used quality tin cutters to cut the square humidifier opening into my plenum and a 6" round hole for my bypass duct into my cold air return. I already have a set of left, center and right tin cutters, I switched between left/right cutters when appropriate to make clean cuts. I used 3/4" sheet metal screws with hex heads for everything. I added true metal tape around seams. Metal foil tape is for taping duct work, which is not the same as "ducttape" which is the more common tape everyone thinks of.Phase 2 I spent about an hour (which hopefully most folks will not have to do) adding a 2 gang metal box at the ceiling above the furnace to mount the 24V transformer (included with the apriaire). I added this to the circuit that powers the furnace. The instrufions tell you not to wire the transformer within the furnace 24v circuits, but it is completely ok and acceptable to wire the 110V transformer to the actual "home" 110V circuit to the furnace. I added a switch in my box so in the summer months I can turn off the transformer when I have the humidifier off. If you are not comfortable with home electrical wiring and you do not have a place to mount your 24V transformer to a 110V source, then plan on either hiring an HVAC or Electrician to add a similar box for your situation.Phase 3 I spent about an hour running a 1/4" water line from a hot water source to the Humidifier. The only thing I needed to purchase was 10' of 1/4" copper pipe. I used a couple pieces of pipe strap to hold the piping in place for my situation. A flare wrench is necessary to tighten these fittings correctly.Phase 4 I spent about 3 hours running thermostat wires as instructed in the kit. I used a stepping drill bit to drill the 3/4" hole needed for the humidistat then mounted the humidistat with two sheet metal screws, as others mentioned you need to use at least 3/4" long sheet metal screws for this mounting. I used one run of 18-5 thermostat wire to go between the humidistat and the furnace. I also got a really long run of 18-2 thermostat and door bell wire, most of it was for the outside sensor, some was used to connect the transformer, hunidifier water line solenoid and humidistat together.The system works well. I like the options to be able to let it run on its own or only when the furnace is running. I also like the outside temperature feature, basically you set this humidistat to where you want it and forget it and it will keep the humidity at a level that is no too excessive. If you over humidify your home, you will get water condensation on the windows which you do not want. The humidistat is simple to use and the bright blue display is easy to read. It would be great if it also reported the outside temperature, but it's only job is to report the relative humidity, which it does.I was told as a tip to use electrical twist caps at the humidifier water line solenoid and at the outside temperature sensor. These are serviceable parts, by using twist wire caps as apposed to butt connectors or soldering it will made it easier to replace these parts if they were ever to fail.Update:I only use the humidifier from about late December through Early March. I was warned last year that if the humidifier is always working you can over humidify the home which encourages mold growth in the duct work.The home feels warmer inside with the humidifier, even though the thermostat set at the same temperature.As for the humidifier setting itself, I have it set at 2 for our home. I did initially have it set to 4 which created way too much humidity in our home.
W**R
Outstanding Product!
What a GREAT product. Was unaware of this company over the more well-known Honeywell, but so glad I found this.The price at $125 I paid here was amazing, but realize that additional costs up to $75 will be needed for tools/parts depending on what you already have around the house. This is definitely a solid 3-5 hour install depending on your knowledge, not including the trip to the hardware store. Bottom line, what a great product. Works perfectly and got our 2500 sq ft. house from a horrible 15% humidity up to 30% in about 2 days -- extremely impressive.I will amend a previous review with the needed parts for the every-day homeowner:1.) #8 self tap sheet metal screws - 3/4" length (any longer than that will block the summer to winter switch). You'll need anywhere from 8 to 14 of them depending on how you do your duct-work2.) 1/4" outside diameter copper water line - Home Depot sold it in a 10ft section.3.) 1/2" inside diameter clear vinyl tubing for drain4.) 5/8" Clamp to attach the vinyl drain tubing to the humidifier5.) A half dozen small Wire nuts for 20-22 gauge wire.6.) A 6" start collar for bypass connection (furnace side) I found a collar that included a 90 degree.7.) A 6" adjustable 90 degree elbow(s) for bypass connection (screws into humidifier input)8.) To connect the starting collar to the 90 degree elbow at the other end, you can use 6" pipe or flexible hose.I opted for flexible hose and 2 6" screw down clamps.9.) 50 ft. 18-2 thermostat wire (it's way cheaper than 18-5 wire, unless the colors are THAT important to you. I just tagged the wires with sticky labels inside the furnace for future reference). You'll need the extra wire to run the outdoor temperature sensor outside since they give you a measly 5 ft of wire on it.10.) HVAC foil duct tape... used on the start collar, and I also used it as added bond where the flexible hose met the start collar and 90 degree elbow. This stuff unfortunately only comes in 100 ft rolls. You can use it to wrap your kids or probably fix the hundreds of shotty ductwork connections around your house.11.) 1/2" peel and stick weatherstripping to seal the 500 casing to the duct work.Tools:1.) Drill2.) Tiny flat head screw driver for the wiring on humidstat.3.) Tin snips (straight and curved)Things I had to buy after the initial trip. Duct work is impossible to penetrate without the right tools. Regular drill bits wouldn't touch this stuff.1.) 3/4" metal hole saw (attached to drill) -- cuts the hole for the humidistat's humidity sensor2.) To cut the rectangle from the template for the Aprilaire 500 into the return duct, I used my dremel oscilating tool. Without the right blade, forget it. The Dremel metal carbide blade ($8.99) cut through it like butter. Would have taken 2 minutes if I'd had that from the beginning instead of burning out a non-metal bit and getting 10% of the way done.Tips. Several folks reported that the 24v transformer didn't work out of the box. I didn't have this problem. Thankfully the switch for our furnace was already in a metal junction box. I just broke out another metal hole and the transformer is already designed to perfectly seat in that hole. Turn on the unit and use a multimeter to verify that you're getting 24-30V AC from it under no load.I flipped the my 500 around to that it was right-facing. What a great design, Everything from the logo to the drain plug is 100% reversible.
Trustpilot
1 day ago
2 days ago
1 day ago
1 month ago