🚀 Revive Your Ride with Confidence!
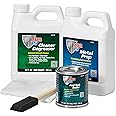
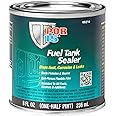
The POR-15 Motorcycle Fuel Tank Repair Kit is a comprehensive solution designed to seal and restore fuel tanks up to 6 gallons. It includes a cleaner degreaser, metal prep, and a fuel tank sealer, ensuring superior strength and resistance against rust and corrosion. Ideal for motorcycles and small fuel tanks, this kit is backed by a satisfaction guarantee, making it a trusted choice for both DIY enthusiasts and professionals.
| Manufacturer | POR-15 |
| Brand | POR-15 |
| Model | 49229 |
| Item Weight | 1 pounds |
| Product Dimensions | 5.5 x 9.5 x 8.5 inches |
| Item model number | 49229 |
| Is Discontinued By Manufacturer | No |
| Manufacturer Part Number | 49229 |
| OEM Part Number | 49229 |
A**R
Product Worked Great
I have a 1979 Yamaha XS750F that has been sitting in my garage for the better part of 30 years (though I did clean the carbs and ride it a bit in 2004). The gas tank had about a gallon of old gas in it (more like turpentine) and was caked with a hard layer of crude. After removing the crude and using the POR-15 treatment regime the inside of the tank now looks great.Some responders have stated that this product didn't work and that they followed the instructions in detail. However what they probably failed to do was get rid of that layer of of hard crude stuck to the inside of the tank first. You must remove this hard layer of crude first - and it is not an easy thing to do. First I power washed the inside of the tank. Then I added about a gallon of hot water and added a large cup full of nuts and washers and repeatedly shook and rolled the this mixture around the tank to break up the crude. I repeated this step over and over about 20+ times. I also used a wooden dowel to reach into the tank to break loose some of the crude. After this I filled the tank with 4.5 gallons of Metal Rescue and let it sit for over a week (this stuff also works great).Once I had the hard scaled crude removed from the tank I used the POR-15 treatment regime. I probably didn't need to do the degreaser/cleaner since I had just done the Metal Rescue soak but I did it anyway. The metal prep and final seal coat worked great. I have a tank that is like new again.PS: The dual vacuum petcocks on the tank were removed for this treatment and were replaced with a small steel plate and gasket. The petcocks were also caked with crude and required teardown and extensive cleaning (as did the carbs) - so if you don't have an ultrasonic cleaner I would add that to your shopping list as well.
A**Y
Awesome Product
Did an amazing job restoring my Vstar gas tank. Very happy with the receipts and how easy it was to complete the work. Will definitely buy again and recommend to friends.
A**X
Great Product
I waited about a month before writing this review, just to test the product out and see if it would hold - which it did!It’s a meticulous process, but it provides great results if you follow the steps correctly.I used this kit on an old Yamaha XT tank and I’m very happy with the result.The first picture is of all the junk that came out of the tank when I flushed the cleaner/degreaser out. Second picture is the before and third picture is the after.Will definitely use again on other projects.
A**T
Absolutely fantastic stuff.
All I can say is this product saved my bike rebuild. When flushing tank from a bike I bought rhat sat foe 2 years, about 1/4 of rust chips came out. I thought oh man, project done. Looked up this product and it had good reviews. I followed instructions to the letter especially the not rushing the process. Took my time with all three steps as instructed. Dried tank throughly prior to final step and man, tank look like new inside. Absolutely loved the results. Don't rush the process and your results will be the fantastic.
J**R
but a friend recommended this so I figured better safe than sorry
I first cleaned out my tank using vinegar and thought it did okay, but a friend recommended this so I figured better safe than sorry. The instructions say to seal up holes with duct tape which was a bad move. The cleaner immediately ate the adhesive off and leaked out before I could stop it. Since I’d already cleaned it once before I decided to move on to the next step which is the rust neutralizer. It seems to have done the trick better than water and baking soda. My tank isn’t very rust at all, just some surface rust on the inside so I haven’t used the sealant yet, I just went straight to filling the tank up with gas.Products seem to work, but instead of duct tape I’d recommend something a little more hardcore like the 3M automotive rubber adhesive, that did the trick for me.
J**.
Amazing stuff
I used this to repair a metal tank that had some rust holes in the bottom, nothing larger than 1/8th to 3/16s. I used cloth and patched the outside first and then a day later I painted the inside of the tank. I could not remove the tank so the work had to be done while it was part of the machine. Be sure to follow the directions for cleaning both inside and outside the tank. The cleaners that come with this kit do a great job. Be patient and follow the directions. If you need assistance call the number in the directions and the people who answer are more than happy to help explaining any questions you may have. The paint itself dries really hard so do not get on your clothes as is will be permanent. Dries slowly so you have time to do the work. Some of the other epoxy methods dry very quickly and you do not have all that much time. Very good product and I would buy again. The paint is a very thin liquid and not a gel. I just kept coating the cloth on the outside and let it dry over a day before moving on. Don't be in a hurry.
Trustpilot
1 month ago
1 month ago