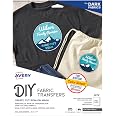
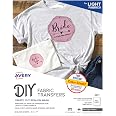
🔥 Transform your dark fabrics into wearable art with ease!
Avery Printable Heat Transfer Paper (5 sheets, 8.5" x 11") is designed for dark cotton and cotton/poly fabrics, delivering vivid, fade-resistant prints compatible with inkjet printers. Featuring a Color Shield formula, it guarantees durable, crack-free designs lasting up to 20 washes. Perfect for custom shirts, uniforms, and gifts, it supports easy application via household irons or heat presses and offers versatile design options through Avery’s online tools.
Brand | AVERY |
Color | White |
Material | Paper |
Size | 8.5" x 11" |
Number of Pieces | 5 |
Fabric Type | 100 Cotton |
Product Dimensions | 12.09"L x 9.44"W |
UPC | 072782032791 |
Global Trade Identification Number | 00072782032791 |
Manufacturer | AVERY |
Part Number | 3279 |
Item Weight | 0.96 ounces |
Item model number | 3279 |
Batteries | 1 12V batteries required. |
Is Discontinued By Manufacturer | No |
Style | 5 transfers |
Pattern | Transfer Paper |
Shape | L Shaped |
Item Package Quantity | 1 |
Included Components | Supplies |
Batteries Included? | No |
Batteries Required? | No |
Battery Cell Type | Alkaline |
Warranty Description | No |
S**Y
Wash the shirts, do not print in reverse, peel the back first !!! (and more)
These work really well, fourth time we are using this! A few tips for you, especially since the instructions leave a bit to be desired.1) WASH THE SHIRT FIRSTI forgot about the washing of the shirts ahead of time. The first time we used these the shirts are still hanging in there after about two years and multiple washes. The next two times we forgot to wash the shirts, the iron ons looked great but are peeling a bit already.2) DO NOT PRINT IN REVERSE, THIS IS NOT AN IRON ON TRANSFER! THINK OF IT MORE LIKE AN IRON ON PATCH!Meaning: What you print out is what you will see EXACTLY on your shirt. The ink does not transfer to your shirt. if you're not sure what that means, do you know those little kid toy tattoos that you peel, apply to skin, and then put a wet sponge on the back of the tattoo to get the ink to "transfer" to the skin (and it does it in reverse of what you see). That is a transfer. This is more like an iron on patch, but instead of a patch, it is what you print out on the printer sheet.3) PEEL THE BACKING FIRST!Because the "iron on patch" will be stuck to the surface it is on. If you do not peel the backing, then your print will be forever sealed to the backing. You want it sealed onto the shirt. Fortunately, the back of the sheet has numerous pieces on it, not just one big piece, so I was able to cut the shape of the heart on my transfer and still was able to peel it quite easily.4) Use the white sheet included in between the iron and the printable.I think otherwise you may discolor your shirt with all the heat from the iron5) 3 minutes, not a lot of pressure, repeatedly going over the entire printable esp the edgesI did not use anything close to a lot of pressure, I think that also may discolor your fabric. Just fairly light even pressure over the course of 3 minutes, not staying in any one place too long, over and over and over6) Let the surface cool down a bit after each ironMostly because otherwise the next shirt will get hot when you put it down and it's waiting and you don't want to accidentally have your iron on printable get heat sealed any little bit before you apply the iron. Just to be on the safe sideGreat product!!!
M**H
10 Stars.
This works GREAT ! If you want to customize your own t-shirt or clothing, this product by Avery will definitely do the trick. All you need is a Color Ink Jet Printer and an Iron. And obviously a Computer. Once you purchase this Heat Transfer paper, you go to Avery's Site for the Template design you want, upload your photo onto the template and print it out. It is best if you already have Adobe installed on your Computer too since the Avery site will more or less insist you save the file in PDF format. When you insert the paper in the tray, insert upside down like you would a glossy. The instructions are very simple to follow. After you've printed onto the transfer sheet, cut around it, getting rid of what you don't want ironed onto your project. Then separate the back of the transfer paper from the decal itself. lay the decal onto the project clothing. Then lay the thin sheet of document paper on top of the decal or transfer paper. Using a hot, but dry iron, iron it for several minutes. Making sure you iron it on a hard surface. Not an ironing board. I used a big wood cutting board. It came out perfect my first try. And honestly that's unusual. So that's how easy this is to do. You can customize just about anything you can print out. I'm very pleased with this product and wouldn't hesitate recommending it to anyone. You can see HOW To video's on YouTube also before you give it a go. My picture below is what I made and ironed on a t-shirt.
A**A
Easy and clear directions.
I wanted to make shirts to wear to Disneyland. These were so easy, directions were clear and it worked perfectly.
B**A
Buying this product again.
So far, love! After three washes, there’s no bleeding, no rips or tears, I was a little worried that the edges would peel, but so far no peeling. The colors came out amazing and still vibrant. The only thing I can say is the print on the shirt that I put on is stiffer than others. The photo is how it looks after three washes.
Trustpilot
1 day ago
4 days ago