🔐 Elevate your safe’s defense with precision-engineered, unbreakable trust.
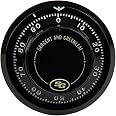
The Sargent & Greenleaf Model 6730-100 Mechanical Safe Lock Kit offers industry-leading attack resistance with a patented torque adjuster and relock trigger, tested over 20 hours against expert manipulation. Crafted from premium solid brass components, it supports up to 1,000,000 unique combinations via three key-changeable metal wheels. This all-inclusive kit is trusted globally for securing home, commercial, and gun safes, delivering unmatched durability and peace of mind.
Brand | Sargent & Greenleaf |
Special Feature | Keyless Features, Lockable |
Lock Type | Square Bolt |
Item dimensions L x W x H | 7.75 x 4.25 x 4.63 inches |
Material | Brass, Metal |
Recommended Uses For Product | Home and commercial safes, gun safes, cabinet-style safes, and spaces requiring enhanced attack resistance and a high-security mechanical lock. |
Style | Modern |
Color | Black |
Number of Pieces | 2 |
Finish Type | Black |
Included Components | safe, battery |
Controller Type | Ring |
Shape | Round |
Item Weight | 2.25 Pounds |
Control Method | Touch |
Model Name | 6730-100 |
Global Trade Identification Number | 00850001149006 |
Manufacturer | Sargent & Greenleaf |
Part Number | 6730-100 |
Item Weight | 2.25 pounds |
Product Dimensions | 7.75 x 4.25 x 4.63 inches |
Item model number | 6730-100 |
Batteries | 1 9V batteries required. |
Is Discontinued By Manufacturer | No |
Size | 1 Count (Pack of 1) |
Finish | Black |
Item Package Quantity | 1 |
Special Features | Keyless Features, Lockable |
Batteries Included? | No |
Batteries Required? | No |
Warranty Description | Two Year Limited Warranty |
P**
It’s Awesome & it works perfectly had mine for about 10 years now!!!
Oh yes you should definitely get this to replace that digital lock it’ll always work and it’s easy to install I just watched someone on YouTube install theirs didn’t take about 10 to 15 minutes and hey if there’s ever an EMP you’ll be all good because it’s manual no electrical components it’s better to be safe then sorry especially when it comes to your actual pew pew safe!!! Fit, functionality, quality all 100% can’t go wrong well unless you can’t read instructions or use tools hmmm!!!
J**J
Solid Combination Lock, Easy to Install, Excellent instructions.
Bought this to replace a existing dial lock that had warn out after 25 years. The original was a Sargent and Greenleaf combination lock so I replace it with this new one. Well made, very easy to work with and install, solid combination lock.Prior to ordering make sure the model will fit your safe. Go to the Sargent and Greenleaf page and follow the instructions to identify your present lock, so you can purchase the correct replacement unit.The kit comes complete with everything you need. The instructions are excellent. Make sure you read them completely before you start the replacement of your lock. Note the manufacturer recommends a professional. I completed my install/replacement on my own. I have never done it before, but with these directions there is no way to go wrong. Take your time and you will have your replacement installed quickly.Setting your combination is easy using the separate instructions.Well made, easy to install, fit perfectly.Would buy again and I do recommend.
K**E
Works with Costco's Heritage 14 Gun 10.8 CuFt safe.
I have a client that has the Costco's Heritage 14 Gun safe. We have retrofitted it to be used for files and valuables. It was cheap and worked in the space they had for the safe. They were worried about the bad reviews about the electronic lock failing. Based on the previous review of this product working on this model safe I purchased the Sargent and Greenleaf 6730-100 Safe Lock Kit to retrofit the safe to a manual lock. The instructions are straightforward but I would say you need to be somewhat handy. I would highly recommend you look at the “S&G 6730 Combination Lock Installation” YouTube install video.As mentioned in a previous review. If you wish to retrofit a Costco's Heritage 14 Gun safe you will need to do a little extra work. It is not plug and play but not hard. You will need to drill & tap two additional holes on the outside of the safe for the dial ring and you will need to tap two (top 2 holes) of the 4 holes inside the safe for the lock body. Items you will need are:• Magnetic screwdriver as it will be very helpful• 1/8 drill bit for the outside holes• 8-32 tap for the outside holes• ¼-20 tap for the two existing inside holes• A center punch for setting a drill spot on the outside holes (helpful but not mandatory)• Vise grip for holding the emergency lock in place (helpful but not mandatory)Step by step may be helpful - First open the safe and remove the paneling on the inside of the door (undo 8 phillips screws). Then lift up on the digital keypad to remove it from the door. Unscrew the 2 phillips screws on the back of the keypad and disconnect the cable from the lock body inside the safe from the keypad (the cable that runs into the keypad just unplugs after you remove the back). Now go back into the inside of the door and use your vise grips to lock the emergency lockout in the up position (as outlined in the YouTube video). Now unscrew the front white plate and set it to side. unscrew the lock body from the door and remove it. From there follow the directions and the video drilling and tapping where needed. If you’re handy and have everything together it should take you about an hour. May be helpful to remove the door from the safe. To do this just pull the door straight up.If you watch the video and follow the directions it should be fairly easy. Instructions are very good and the quality of the components is excellent. I would add one thing that is different; the combination lock is not like you high school locker lock. To open you go right 4 times > Left 3 times > right 2 times > and then you turn it about halfway to unlock. Not really an issue but defiantly different and something you will need to get used to. Hope this all helps.
T**S
Great lock, with some caveats.
Having now completed not one but two installations of this lock on different gun safes, I feel pretty qualified to give a review in case it might help someone out there. Similar to some other reviewers, I found the included instructions for setting a combination once the lock has been installed to be virtually worthless. Do a search for "S&G 6730 combination lock installation" (video, dated May 3. 2012) and follow the instructions you find. In fact, this is a great video to watch in general just to see what you are possibly getting into, if trying to make up your mind about attempting this yourself. Okay, now let's talk more about installation...In my particular case, I have fitted this lock to two different gun safes, both of which were purchased from TSC. The first safe was a Cannon model 756030 that came with a Securam electronic lock. While this lock has never given me any problems in the 5 years I've owned the safe, I have always worried about it. The installation of the S&G 6730 on this safe was about as straightforward as could be expected, since the electronic solenoid module inside the safe has the same "footprint" as the 6730 lock body. Literally just unbolt the old and bolt in the new (same screw thread). The electronic keypad is attached door by two screw studs that, after being removed, are exactly the right spacing and thread to mount the 6730 dial ring. After that, follow the instructions to cut the dial spindle (which is pretty straightforward), put the relocker plate back on the bolt body, and you are done. Took me all of 45 minutes, going slow and careful.The second safe I have installed this lock on was a Winchester TS-9-EFL. This particular safe came with an unidentified electronic lock, which may or may not be a LaGard (I've read that it is in some forums). In any case, after just over a year this lock decided to suddenly not work, in the form of half the numbers on the keypad not responding. I finally got it working again after removing the battery and figuring out how to fully discharge a capacitor (and, a lot of stress). At that point, I just left the safe unlocked and ordered this 6730 kit from Amazon. The installation on this safe, however, turned out to be nothing like the Cannon. On the Winchester the electronic solenoid module was a completely different footprint from the 6730 lock body, there were no existing holes on the door face for mounting the 6730 dial ring, and the location of the pass through hole for the wires (through which I wanted to put the dial spindle) wouldn't put the 6730 lock body in the right place to interface with the linkage inside the safe door. However, after studying things for a while, I finally ended up drilling and tapping 4 holes inside the door to mount the lock body, 2 holes on the outside of the door to mount the dial ring, used the existing wire pass through hole for the spindle, and fabricated a new metal piece that I bolted to the internal linkage to serve as the interface with the 6730 bolt. This took me about 4 hours to complete, including head-scratching time figuring it all out. In any case, this was a considerably more complex installation, certainly "possible" (at least for the person with the proper tools) but a lot more involved.So, trying to wrap this up...this S&G 6730 lock kit seems like totally the way to go, if like me you have had problems or just worry about an electronic lock. Just be prepared that there might be more or less work involved depending on what safe you are trying to install it on, and lastly, don't even try to use the included instructions for setting the combination.
Trustpilot
4 days ago
3 weeks ago