Desert Online General Trading LLC
Dubai, United Arab Emirates
Desert Online General Trading LLC
Dubai, United Arab Emirates


🔧 Clamp it fast, clamp it strong — the pro’s choice for flawless woodworking!
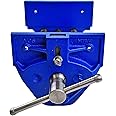
The Yost Vises M7WW is a 7-inch woodworking vise crafted from rugged 30,000 PSI cast iron, featuring a rapid action quick-release lever for ultra-fast jaw adjustments. Designed for both home carpenters and professionals, it offers an 8-inch jaw opening and 3-inch throat depth, combining industrial strength with ergonomic ease. Backed by over a century of Yost’s quality engineering and a 1-year warranty, this vise delivers reliable, precision clamping that keeps your projects moving efficiently.


| Material | Cast Iron |
| Brand | Yost Tools |
| Item dimensions L x W x H | 15.63 x 7.17 x 6.26 inches |
| Color | Blue |
| Style | Yost M7WW |
| Item Weight | 21 Pounds |
| Tensile Strength | 30000 PSI |
| UPC | 789755000113 737278138615 |
| Global Trade Identification Number | 00789755000113 |
| Manufacturer | Yost Tools |
| Part Number | M7WW |
| Item Weight | 21 pounds |
| Product Dimensions | 15.63 x 7.17 x 6.26 inches |
| Item model number | M7WW |
| Is Discontinued By Manufacturer | No |
| Size | 7 inches |
| Pattern | Lever |
| Power Source | Crank |
| Item Package Quantity | 1 |
| Measurement System | Inch |
| Included Components | (1) M7WW vise |
| Batteries Included? | No |
| Batteries Required? | No |
| Warranty Description | 1 year from purchase date |
J**J
An absolute beast
I bought the 10" version, really an awesome vise for wood working, no doubt. You might as well get the 10" over the next size smaller because the weight difference in minimal (like 3lbs).Pros:* Quick release works really well, never fails, is not quirky.* Massive opening capacity.* Absolutely rock solid.* Since the Jaws are tall, you have great depth for putting something in it compared to your typicalwood vise.Cons:* Heavy, a hair under 40lbs, makes it difficult to handle during installation.* Very difficult installation for me, an amateur, if you choose to install it like I did (see photos).Basically I did not want to have the rear jaw visible, I wanted the jaw cover boards to be level with my workbench, and I wanted to recess the rear jaw cover board to save space. This required to a) cut out a slot to recess the 2" hard maple for the rear jaw, which was easy with a jig saw, b) use a 55mm shim board to lower the beast, and c) then cutout space for the rear jaw recess, not easy, so it was like a 2 step cut out using an oscillating tool. The hard maple jaw covers I used were about 12x5x2.I was seriously concerned about getting injured while installing it by my self.Tips:* Map out your dog holes and drill them with a forstner bit first BEFORE the vice is installed. I drilledlater and was hitting steel, which was a nightmare and screwed up some holes.* Dog holes need to be perfectly aligned, or you will be sorry when you go to use them.* I used a rolling tool drawer cart to rest the vise on while fitting it, its simply too heave for me tohold it into position while fitting.* For a 1.5" thick workbench, I think the proper shim thickness is around 55mm. I made mine 50mmand it was not thick enough, so I had to add shims to my shim.* A great workbench to attach it to is a Gladiator. They have adjustable height with solid Maple tops,and It does not have a bunch of obstructive steel support stuff on the underside of the bench.Mine is a 6' version due to space limitations, I'd get an 8' if I had more space.* The rubberized cork on the face of the jaw boards is worth it, makes the vise ridiculously grippy.While the installation was both difficult and scary for me, I am quite pleased with the vise, I could not imagine a better wood working vice. If I had the money, it would have been better to pay a carpenter to install it, but then I wouldn't have learned anything.
M**N
Rock solid woodworking vise
I bought this vise for my small basement woodworking shop. This is Yost's smallest woodworking vise, but it weighs in at 22 lbs. nonetheless. It seems well-made, feels rock solid, and should last 100 years. The jaws line up perfectly. I like the quick-release feature and the chunky built-in retractable iron dog on the movable jaw.Cons. The screw is just a bit stiff to turn and the quick-release is also a little stiff, but both are very functional.The vise had been dropped hard on the back end of the screw during shipping. That was evident because there were holes in the factory box and the Amazon outer box that had been created when the vise landed. The end plate was badly bent and one side of the screw shaft had flared upon impact. I had to file it off to remove and straighten the end plate. Fortunately, my DIY repair was successful, so I didn't have to initiate an exchange.I'm sure the interesting screw profile is not new, but I was impressed with its dual functionality. The profile allows very high pressure to be applied during clamping, but when backing the screw out, the profile also permits the nut to cam out and ratchet when it encounters resistance such as when you reach the end of travel. Thus, you can't damage the mechanism by backing out "too far."I think I'm going to love this vise. I would recommend it for amateur woodworkers or a pro shop.
R**X
Buy it!
I recently received and installed the Yost 7 inch model M7WW. Very pleased with it. It seems almost stupid heavy, but good vises are. It is a nicely finished, well made, quality product and the rapid action feature makes it a pleasure to use. It has great clamping force - no more vise jaw racking and work pieces slipping. Limited use so far, but It held everything solidly while I sawed and planed material. The vise is easily operated with one hand, even the rapid action feature, leaving the other hand free to position the material to be clamped.Be aware - this thing is heavy, the shipping preservative makes it slick, and it comes with very sharp edges. While lugging the boxed vise downstairs to my shop, I pretty much knew I would need to reinforce my light weight workbench to handle this blue monster. Working over a layer of cardboard on my work bench, I removed the preservative first, using a citrus based solvent and paper towels. Be careful around the sharp edges of the vise jaws. Cleaning the vise threads was easier after the vise was mounted: I put several layers of paper towels over the edge of a putty knife and held the blade into the thread recesses while turning the vise handle. After cleaning away the preservative, I spent several minutes with a file removing the flesh eating sharp edges along the machined surfaces, vacuumed up the metal filings and a little flesh, then washed my very dirty hands. I applied Boeshield T-9, a lubricant and metal protector that leaves a dry surface to minimize sawdust build up.I then quickly mounted the vise to my bench and lived happily ever after! In my dreams, anyway. My installation become a bit complicated. If interested in ghastly details, continue reading.I set my workbench upside down on a table so I could better access the vise mounting area. Two problems became immediately apparent. Alas, there would be more but less apparent problems later on. First, my work bench’s seemingly 2-1/2 inch thick top was not solid. It has a 3/4 inch thick top set inside 3/4 by 2-1/2 inch wide skirt boards. This leaves a void of 1-3/4 deep by about 4 by 18 inches in the area where the vise would be mounted. Yost recommends the bench top be at least 2-3/8 inches thick where the vise is to be mounted. The second, immediately apparent issue involved the bench’s wooden crosspiece that supported the top and the legs. This crosspiece interfered with the vise’s sliding mechanism that hangs about 3-3/4 inches below the bottom of the bench top, is about 5 inches wide, and projects back under the bench about 12-1/2 inches from the edge of the bench top. If I would have mounted the vise on the side of the bench top instead of the end, I might have avoided this leg crosspiece interference problem, but that wasn’t the location I wanted.For the void issue, I decided to fill that area in with 2x material ripped and cut for a snug fit flush with the bench top skirting, then glued, screwed and clamped all of the pieces into place. I sanded the varnished bench top under surfaces prior to gluing for a better glue bite. I added a 2-1/2 inch wide piece of 2x4 to the end of the bench top to provide a solid place for anchoring the front two vise mounting lag screws, rather than in a glue joint. Then I covered the bottom of this ripped 2x4 and the filled in area with a layer of 3/4 inch plywood, glued and screwed into place. While the plywood layer would put the top of the vise 3/4 inch below the bench top, it reduced the crosspiece interference problem to an acceptable amount of crosspiece material to be removed. It also added reinforcement to the area. The vise would now mount against the plywood and the 2x4.Apparently I was becoming a vise snob as I felt the need to stain and varnish the added wood before attaching the vise. Finally ready to mount the vise, I clamped the vise into position, drilled 1/4 inch pilot holes for the four 5/16 inch diameter lag bolts (not included), and fastened the vise to the bench. This area of my bench top was now 3-1/4 inch thick, and with the added thickness of the vise bottom and a flat washer, I used 3 inch long lag screws. I carefully set the now much heavier work bench back on its feet. With the vise anchored to the bench, the vise’s smooth and rapid action was amazing.The added plywood layer also meant that the vise dog would no longer extend above the top of the bench. I couldn’t find longer dogs or dog extensions, but did find an online site offering a steel bar measuring 1/2 x 1 x 4 inches. After a bit of grinding and filing the 1/2 inch thickness back to about .47 inches on the lower 2-1/2 inches of the steel bar, it now fits into the dog pocket of the vise. I now have a drop-in steel vise dog that extends an inch above my bench top when needed.With the new vise fully extended, the handle is about 18 horizontal inches away from the nearest leg pair. That’s a lot of overhang on a fairly light work bench. With the vise closed, the overhang is about 11 inches. I cut pieces of 2x4 to make two bench leg “side extensions” that were 20 inches long, tapered them for a better look, and also stained and varnished them (that vise snob thing). These were screwed to the bottom part of the two bench legs closest to the vise, with the 1-1/2 inch edges extending toward the vise, touching the floor, and reducing the overhang by 3-1/2 inches. This seemed effective and also noticeably stiffened that pair of legs. See the attached photo, which also shows modifications for a different project.There was still some undesirable rocking of the workbench’s legs, so I made a 14 inch long diagonal brace for each leg using 1x4’s mitered at 45 degree at both ends, and screwed them to the bench top skirt boards and to the legs. This made a big improvement in the bench’s stability.Vise jaw faces. The jaw face mounting holes in the vise jaws are not threaded, and the front jaw face mounting holes are not aligned with the rear jaw holes. Wood screws or sheet metal screws will be needed to mount the jaw faces. While the rear jaw face could be attached with screws from the back of the rear jaw, it won’t then be possible to remove the face without removing the vise. I wanted to be able to quickly and easily swap out jaw faces, which meant attaching the rear jaw face after the vise was mounted, with visible but recessed screws, through the rear jaw holes and into the edge of the bench top. It is easier to mark the position of the rear jaw face screw holes on the back of the face before the vise is mounted, by working from the back of the rear jaw. The front jaw face is easily marked and positioned after the vise is mounted.I used 3/4 inch plywood for my first set of jaw faces, and cut them 3-5/8 inches high and 9 inches wide, a bit taller and wider than the 7 inch wide jaws. This put the the top of the jaw facings at the same height as the bench top after my modifications.I knew it would be a bit of a challenge to put this vise on my particular bench, but I’m glad I made the needed modifications as this vise is so way better than my previous vises. It is truly a bargain - buy it!
Trustpilot
2 weeks ago
3 weeks ago